“`html
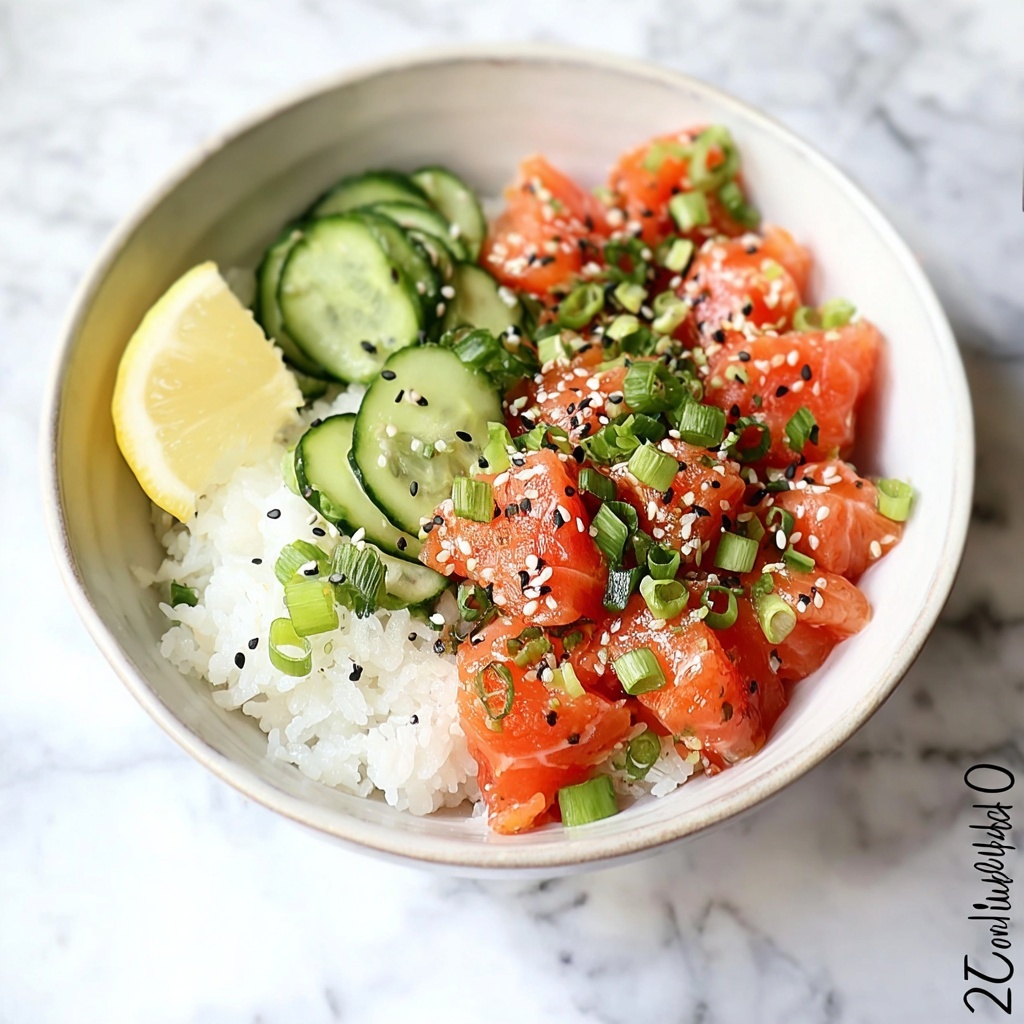
There is something truly magical about a bowl that brings elegance, flavor, and ease together, and that is exactly what the Quick Miso Soy Salmon Sashimi Bowl Recipe delivers. This stunning dish combines silky sushi-grade salmon with a vibrant miso soy dressing to create a sashimi bowl you will crave every week. Whether you’re craving a light lunch or a show-stopping dinner that feels special but comes together in a flash, this recipe hits every mark with fresh ingredients, bold umami, and effortless prep. Get ready to dive into a bowl of beautiful colors and unforgettable taste!
Ingredients You’ll Need
These simple but essential ingredients each play a key role in bringing flavor, texture, and color to your bowl. From the rich umami of the miso and soy sauce to the fresh crunch of cucumber and the silky salmon slices, every element combines harmoniously to give you the perfect sashimi bowl experience.
- 8 ounces Sushi-Grade Salmon: Always ensure you use sushi-grade for safety and that fresh, buttery texture that melts in your mouth.
- 1 tablespoon Capers: Adds a delightful salty pop that contrasts beautifully with the smooth salmon.
- 1/4 medium Red Onion: Provides a gentle sharpness and vibrant color; green onions can be swapped for a milder bite.
- 1 medium Cucumber: Choose any firm variety for fresh crunch and cooling balance.
- 1 tablespoon Sesame Seeds: Offers a subtle nuttiness and toasty aroma; poppy seeds can be used for a twist.
- 1 tablespoon Chives: A fresh herbaceous touch that brightens every bite; parsley works well too.
- 2 tablespoons Olive Oil: Preferably extra-virgin for a fruity richness that rounds out the dressing.
- 1 teaspoon Sesame Oil: Optional but highly recommended for that irresistible nutty fragrance.
- 2 tablespoons Soy Sauce: The salty backbone of the dressing; tamari is a great gluten-free choice.
- 2 tablespoons White Miso: Brings depth and smooth umami; red miso provides a heartier alternative.
- 1 tablespoon Lemon Juice: Adds bright acidity to balance the richness; lime juice can substitute happily.
- 1 teaspoon Brown Sugar: A touch of sweetness to round out flavors; honey can be a warmer swap.
- Flaky Salt, to taste: To enhance and finish the dish perfectly.
- Black Pepper, to taste: For a hint of spice and complexity.
- 1 cup Sushi Rice (Optional): If you want a more filling bowl, sushi rice is the traditional and satisfying base.
How to Make Quick Miso Soy Salmon Sashimi Bowl Recipe
Step 1: Prepare the Miso Soy Dressing
In a small bowl, whisk together olive oil, sesame oil, soy sauce, white miso, lemon juice, and brown sugar until smooth and well combined. This dressing is your flavor powerhouse—creamy, salty, tangy, with just the right touch of sweetness to complement the salmon perfectly.
Step 2: Slice the Salmon
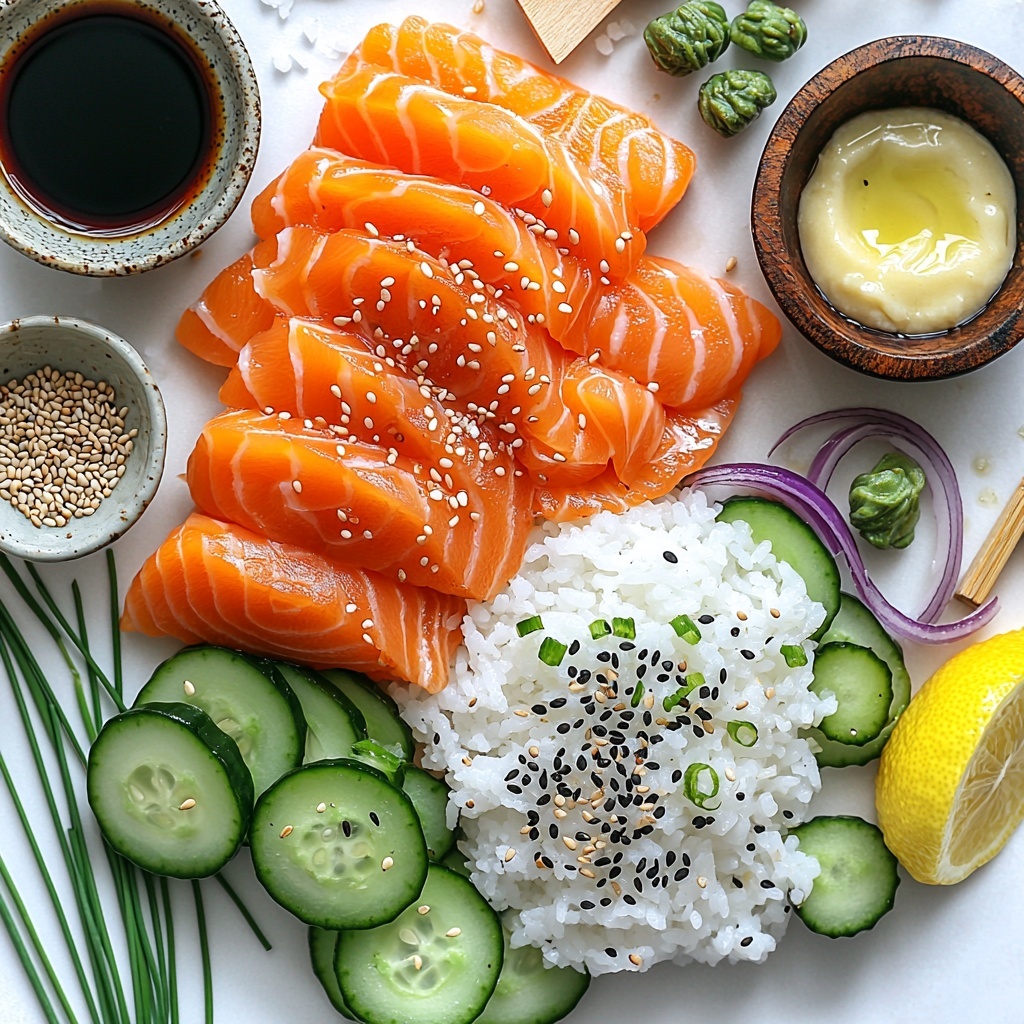
Using a very sharp knife, slice the sushi-grade salmon thinly against the grain. Thin slices ensure a tender bite that soaks up the dressing better and highlights the fish’s buttery texture. Take your time here—beautiful slices make all the difference.
Step 3: Prepare the Vegetables and Garnishes
Slice the cucumber into thin, even rounds and finely chop the red onion and chives. These add crisp textures and fresh bursts of flavor, balancing the rich salmon and savory miso sauce.
Step 4: Assemble Your Bowl
In a beautiful serving bowl, carefully arrange the salmon slices so they overlap slightly, creating a luxurious, inviting presentation. Add cucumber slices and sprinkle with sesame seeds, chopped red onion, and chives. Drizzle the miso soy dressing generously over everything, then season with flaky salt and black pepper to taste.
Step 5: Final Touches
Top the bowl with capers for their tangy pop and, if you like, serve everything over a bed of warm sushi rice to turn this into a heartier meal. Your Quick Miso Soy Salmon Sashimi Bowl Recipe is now ready to enjoy!
How to Serve Quick Miso Soy Salmon Sashimi Bowl Recipe
Garnishes
Fresh garnishes can elevate this dish beautifully. Consider adding extra chives or a sprinkle of toasted sesame seeds just before serving for a nutty crunch. Lemon zest or thinly sliced radish can introduce a fresh, citrusy brightness and appealing color contrast that makes every bite exciting.
Side Dishes
When serving your Quick Miso Soy Salmon Sashimi Bowl Recipe, simple sides work best. A crisp seaweed salad or lightly pickled vegetables will keep things light and enhance the umami flavors. Steamed edamame or miso soup round out the meal perfectly for a satisfying Japanese-inspired spread.
Creative Ways to Present
Want to impress? Serve the salmon sashimi on individual small bowls over sushi rice for an elegant plated look, or use a large communal bowl for a casual sharing vibe. Add edible flowers or microgreens topped with a few flakes of nori for an extra pop of color and texture. The presentation can be as fresh and vibrant as the ingredients themselves.
Make Ahead and Storage
Storing Leftovers
If you have any leftovers of the Quick Miso Soy Salmon Sashimi Bowl Recipe, it is best to store them separately: the salmon in an airtight container in the refrigerator and the dressing in a small jar. Consume leftovers within 3-4 days to ensure maximum freshness and safety, especially due to the raw fish content.
Freezing
This sashimi bowl is best enjoyed fresh, so freezing is not recommended for the salmon or the assembled bowl, as it will affect texture and flavor negatively. If you want to prep ahead, only freeze sushi rice and freshen the other components before serving.
Reheating
Since this recipe centers around raw salmon sashimi, reheating is not advisable. If you serve it over sushi rice, gently warm the rice separately before assembling the bowl again for a fresh taste experience.
FAQs
Can I use a different type of fish for this recipe?
Absolutely! While salmon is the star here, sushi-grade tuna or yellowtail also work wonderfully. Just be sure to use fresh, sushi-grade fish to maintain safety and flavor integrity.
Is it necessary to use white miso, or can I substitute it?
You can substitute white miso with red miso if you prefer a stronger, earthier flavor. Just be mindful that red miso is saltier and more pungent, so you might want to adjust the quantity slightly.
Can I make this dish vegan or vegetarian?
While the Quick Miso Soy Salmon Sashimi Bowl Recipe relies on salmon, you can adapt it by swapping the fish for marinated tofu slices or thinly sliced avocado for a creamy texture, though the flavor profile will naturally be different.
How important is it to use sushi-grade salmon?
Using sushi-grade salmon is crucial since you eat it raw. This grade ensures the fish is fresh and handled under conditions safe for raw consumption, helping you avoid any risks.
Can I prepare the dressing ahead of time?
Yes! The miso soy dressing can be made up to 2 days in advance and stored in the refrigerator. Give it a quick whisk before drizzling over your bowl for the best flavor.
Final Thoughts
This Quick Miso Soy Salmon Sashimi Bowl Recipe truly brings the best of fresh, rich, and tangy flavors into one stunning meal that feels indulgent but takes just minutes to prepare. Perfect for weeknights or entertaining friends, it’s a dish that’s as joyful to make as it is to eat. I can’t wait for you to try it and find your new favorite go-to bowl!
“`
Print
Quick Miso Soy Salmon Sashimi Bowl Recipe
- Prep Time: 10 minutes
- Cook Time: 5 minutes (if using sushi rice, otherwise 0 minutes)
- Total Time: 15 minutes
- Yield: 2 servings
- Category: Main Course
- Method: No-Cook
- Cuisine: Japanese
- Diet: Gluten Free
Description
This Quick Miso Soy Salmon Sashimi Bowl combines the delicate flavors of sushi-grade salmon with a savory miso soy dressing, fresh vegetables, and aromatic garnishes. Ready in just 15 minutes, it’s a light yet satisfying dish perfect for a healthy lunch or dinner that you’ll want to make every week.
Ingredients
Main Ingredients
- 8 ounces Sushi-Grade Salmon (Always ensure you use sushi-grade for safety in raw dishes.)
- 1 tablespoon Capers
- 1/4 medium Red Onion (For a milder taste, swap with green onions.)
- 1 medium Cucumber (Choose any firm variety for the best results.)
- 1 tablespoon Sesame Seeds (Poppy seeds can be used for a twist.)
- 1 tablespoon Chives (Fresh herbs like parsley can work instead.)
- 1 cup Sushi Rice (Optional base for a heartier meal.)
Dressing
- 2 tablespoons Olive Oil (Opt for extra-virgin for the best flavor.)
- 1 teaspoon Sesame Oil (Optional, adds a nutty aroma.)
- 2 tablespoons Soy Sauce (Use tamari for gluten-free option.)
- 2 tablespoons White Miso (Red miso can be a great substitute.)
- 1 tablespoon Lemon Juice (Lime juice can also serve as an alternative.)
- 1 teaspoon Brown Sugar (Honey can be used for a warmer sweetness.)
- to taste Flaky Salt
- to taste Black Pepper
Instructions
- Preparation: Gather all ingredients, making sure the salmon is sushi-grade and fresh.
- Make the Dressing: In a small bowl, whisk together olive oil, sesame oil, soy sauce, white miso, lemon juice, and brown sugar until the mixture is smooth and well combined.
- Slice the Salmon: Using a sharp knife, carefully slice the sushi-grade salmon against the grain into very thin slices to ensure tender texture and optimal flavor.
- Arrange the Bowl: In a serving bowl, artfully layer the salmon slices with a slight overlap. Add sliced cucumber, sprinkle sesame seeds, chopped chives, and finely sliced red onion decoratively over the salmon.
- Add Dressing and Season: Drizzle the prepared miso soy dressing evenly over the salmon and vegetables. Finish by seasoning with flaky salt and freshly ground black pepper to taste.
- Garnish and Serve: Top the bowl with capers for a briny punch. Serve immediately as is or spoon over cooked sushi rice for a more filling meal.
Notes
- Always use sushi-grade salmon to ensure safety when consuming raw fish.
- The sesame oil is optional but adds a lovely nutty aroma to the dressing.
- Substitute red onion with green onions for a milder flavor or omit if you prefer.
- Use tamari in place of soy sauce to make the recipe gluten-free.
- Serving over sushi rice transforms the bowl into a more substantial meal.
- Adjust the brown sugar or honey to your preferred sweetness level in the dressing.


