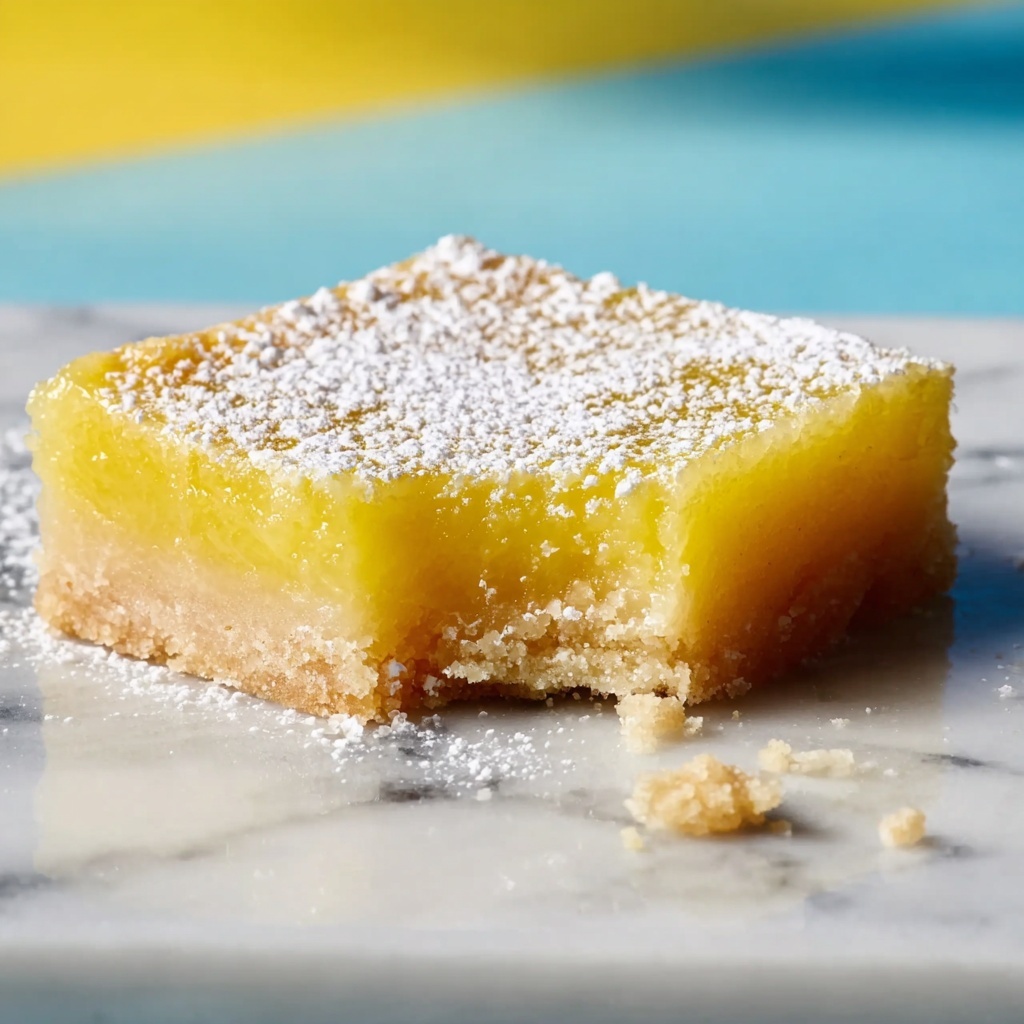
If you’ve been searching for a bright, zesty treat that doesn’t derail your healthy eating goals, you’re in for a real delight with this Healthy Lemon Bars Recipe. It perfectly balances the tangy kick of fresh lemons with a naturally sweet, tender crust, all made from wholesome ingredients that make every bite feel like a little sunshine on your plate. These bars are refreshingly light, yet satisfyingly rich, making them an ideal sweet snack or a stunning dessert to share with friends and family.
Ingredients You’ll Need
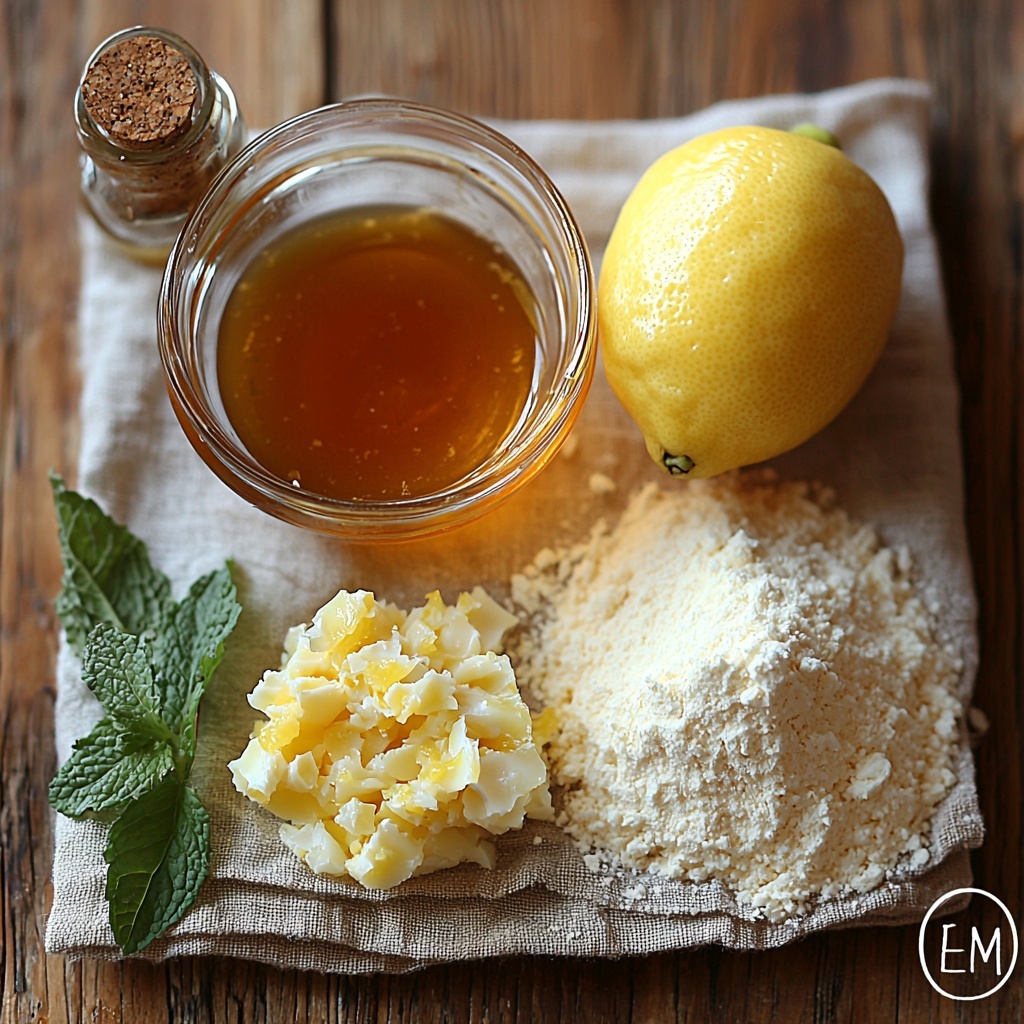
Getting the ingredients right is key to the success of this Healthy Lemon Bars Recipe. Each one brings something special to the table, from natural sweetness and citrus brightness to a texture that’s just right.
- Maple syrup: A natural sweetener that adds depth and a subtle caramel hint without refined sugar.
- Ghee (melted and cooled): Imparts a rich buttery flavor and gives the crust a tender, flaky texture.
- Large eggs: Provide structure and help bind all the ingredients together.
- Bob’s Red Mill Coconut Flour: Offers a light, grain-free base that absorbs moisture well to form the crust.
- Bob’s Red Mill Tapioca Flour: Adds chewiness and elasticity to the dough and filling.
- Lemon zest: Packs an intense citrus aroma and flavor, essential for that authentic lemon bar freshness.
- Vanilla extract: Balances tartness with a warm, sweet undertone.
- Fresh lemon juice: The star of the show—it gives the lemon bars their bright, tangy punch.
How to Make Healthy Lemon Bars Recipe
Step 1: Preheat and Prepare the Crust
Start by setting your oven to 350 degrees Fahrenheit. This ensures the perfect temperature for baking a crust that’s light and just firm enough to hold your luscious lemon filling.
Step 2: Mix the Wet Ingredients for the Crust
In a large bowl, gently combine the maple syrup, melted and cooled ghee, vanilla extract, and one large egg. It’s crucial that the ghee isn’t hot to avoid scrambling the egg. This mixture creates the flavorful moist base of the crust.
Step 3: Combine Dry Ingredients and Form the Dough
Whisk together the coconut and tapioca flours with half a teaspoon of lemon zest in a separate bowl. Gradually add your wet ingredients here, stirring with a fork. It will look a bit wet at first but the coconut flour will absorb the moisture, and soon you’ll have a pliable dough ready to spread.
Step 4: Press and Prick the Dough in the Pan
Line an 8×8-inch baking pan with parchment or lightly spray it. Press the dough evenly into the pan with your fingers or a spatula. Prick the top a few times with a fork—this stops air bubbles and keeps the crust flat during baking.
Step 5: Bake the Crust
Bake the crust at 350 degrees for 8 to 10 minutes. You want the edges to turn slightly golden with the center firming up. If the crust puffs, gently press it down with a fork again—this keeps the texture perfect for the filling.
Step 6: Prepare the Lemon Filling
While the crust bakes, whisk together four large eggs, 1 1/2 tablespoons lemon zest, maple syrup, fresh lemon juice, and tapioca flour until smooth and silky. This mixture is what gives the bars their refreshing zing and luxurious creamy texture.
Step 7: Pour Filling Over Hot Crust
When the crust is done, take it out of the oven and immediately pour the lemon filling over it while it’s still warm. This helps the filling adhere beautifully and bake into a seamless layer.
Step 8: Bake the Filled Bars
Lower your oven temperature to 325 degrees Fahrenheit. Bake the lemon bars for 14 to 16 minutes until they’re just set. The filling should jiggle slightly but not be liquid—overbaking leads to cracks and dryness, so keep a close eye.
Step 9: Cool and Set
Remove the pan from the oven and allow it to cool completely at room temperature. Then pop it into the fridge for at least 90 minutes. This chilling step is essential to achieve that perfect cutting consistency and to enhance the flavors.
Step 10: Slice and Serve
Once chilled and firm, cut the lemon bars into 9 equal squares. They’re delicious on their own, or you can top them with whipped cream or a light dusting of powdered sugar for an irresistible finish.
How to Serve Healthy Lemon Bars Recipe
Garnishes
Simple garnishes elevate your lemon bars to next-level impression. Try fresh lemon slices, a sprinkle of extra lemon zest, or a dollop of coconut whipped cream for added freshness and flair.
Side Dishes
Pair these lemon bars with a cup of herbal tea or a glass of chilled sparkling water with a splash of lemon to enhance the citrus experience without overwhelming the palate.
Creative Ways to Present
For a stunning presentation at parties or brunches, arrange lemon bars on a tiered dessert stand or place each square in a decorative mini cupcake liner. You could even drizzle a little melted dark chocolate over the top for a surprising but delicious contrast.
Make Ahead and Storage
Storing Leftovers
Keep any leftover lemon bars in an airtight container in the refrigerator. They stay fresh and flavorful for up to 4 days, making them perfect for enjoying a quick healthy treat whenever you want one.
Freezing
If you want to keep your lemon bars longer, freeze them in a single layer on a baking sheet first, then transfer to a freezer-safe container. They freeze wonderfully for up to 3 months and thaw easily overnight in the fridge.
Reheating
These bars are best served chilled, but if you prefer them a little warmer, pop them in the microwave for 10-15 seconds or let them sit at room temperature for a short while. Avoid overheating as it affects the texture.
FAQs
Can I use a different flour instead of coconut flour?
Coconut flour is key here because it absorbs moisture uniquely and creates the right texture. Substituting with regular flour or almond flour will change the texture and may require different liquid ratios.
Is ghee necessary or can I use butter?
Ghee adds a nutty, rich flavor and is lactose-free, which some prefer for digestion. You can swap it with unsalted butter, but your final bars might have a slightly different texture and flavor profile.
How tart are these lemon bars?
The lemon bars are pleasantly tart but balanced by the natural sweetness of maple syrup. You can adjust the lemon juice or syrup amounts slightly if you prefer more or less tartness.
Are these lemon bars gluten-free?
Yes, this Healthy Lemon Bars Recipe is naturally gluten-free, thanks to coconut and tapioca flours. It’s a wonderful option for those avoiding gluten without sacrificing deliciousness.
Can I make mini lemon bars instead of squares?
Absolutely! Just use a mini muffin tin and adjust the baking time accordingly—start checking around 10 minutes. Mini bars are perfect for bite-sized indulgence at gatherings.
Final Thoughts
Trust me, once you make this Healthy Lemon Bars Recipe, it will quickly become a favorite in your recipe box. The burst of fresh lemon paired with a soft, slightly sweet crust makes every bite a little moment of joy. Whether you’re treating yourself or impressing friends at your next gathering, these bars deliver flavor and feel-good ingredients you can feel proud about. Go ahead and give it a try—you’re going to love it!
Print
Healthy Lemon Bars Recipe
- Prep Time: 5 minutes
- Cook Time: 25 minutes
- Total Time: 30 minutes prep and cook time plus 90 minutes chilling
- Yield: 9 servings
- Category: Dessert
- Method: Baking
- Cuisine: American
- Diet: Gluten Free
Description
These Healthy Lemon Bars offer a guilt-free twist on a classic dessert, using natural sweeteners like maple syrup and gluten-free flours such as coconut and tapioca flour. They combine a tender, lightly sweetened crust with a bright, tangy lemon filling for a refreshing treat perfect for any occasion. This recipe is gluten-free and uses wholesome ingredients, making it a delicious yet nourishing dessert option.
Ingredients
Crust Ingredients
- 1/4 cup maple syrup
- 1/3 cup ghee, melted and cooled
- 1 large egg
- 2/3 cup Bob’s Red Mill Coconut Flour
- 1/4 cup Bob’s Red Mill Tapioca Flour
- ½ teaspoon lemon zest (zest of about 1/2 lemon)
- 2 teaspoons vanilla extract
Filling Ingredients
- 1/2 cup lemon juice, freshly squeezed (about 4–5 lemons depending on size)
- 1 1/2 tablespoons lemon zest (about zest of 2 lemons)
- 1/3 cup maple syrup
- 4 large eggs
- 2 tablespoons tapioca flour
Instructions
- Preheat the Oven: Set your oven to 350 degrees Fahrenheit (177 degrees Celsius) to prepare for baking the crust.
- Mix Wet Ingredients for Crust: In a large mixing bowl, combine the maple syrup, cooled melted ghee, vanilla extract, and one large egg. Ensure the ghee is not hot to prevent scrambling the egg.
- Combine Dry Ingredients for Crust: In a separate bowl, whisk together the coconut flour, tapioca flour, and ½ teaspoon lemon zest. Gradually add the wet mixture to the dry ingredients, stirring with a fork until a dough-like consistency forms as the coconut flour absorbs the liquid.
- Prepare the Crust: Press the dough evenly into an 8×8-inch baking pan lined with parchment paper or sprayed with cooking spray. Lightly prick the top of the dough a few times with a fork without piercing through.
- Bake the Crust: Bake for 8-10 minutes at 350 degrees Fahrenheit until just set and slightly golden at the edges. If the dough puffs up, gently deflate it by pricking with a fork.
- Prepare the Filling: While the crust is baking, whisk together 4 large eggs, 1 1/2 tablespoons lemon zest, 1/3 cup maple syrup, 1/2 cup freshly squeezed lemon juice, and 2 tablespoons tapioca flour in a bowl until the mixture is completely smooth.
- Add Filling to Crust: Remove the crust from the oven and immediately pour the lemon filling evenly over it without allowing the crust to cool.
- Bake the Filled Bars: Lower the oven temperature to 325 degrees Fahrenheit (163 degrees Celsius) and bake the filled pan for 14-16 minutes. Watch closely to ensure the bars just set, avoiding overbaking which can cause cracking.
- Cool and Chill: Remove the lemon bars from the oven and allow them to cool completely at room temperature. Then refrigerate for at least 90 minutes to fully set before slicing.
- Serve: Cut into 9 squares and serve chilled. Optionally, top with whipped topping or a dusting of powdered sugar for a classic finish.
Notes
- Use fresh lemon juice and zest for the best flavor impact.
- Ensure ghee is cooled before mixing with egg to avoid scrambling.
- Press the crust dough firmly and evenly for uniform baking.
- Do not overbake the lemon filling to prevent cracks.
- Refrigeration is key to allow bars to set properly and enhance texture.
- This recipe is gluten-free and suitable for those avoiding grains.

