Chocolate Biscuit Refrigerator Cake: A No-Bake Delight Recipe is an absolute treasure for anyone who loves rich, chocolatey treats without the fuss of baking. This is the kind of dessert that feels indulgent yet is incredibly straightforward to make—layered crunchy biscuits meet luscious chocolate ganache in a silky, cool cake that melts in your mouth. Whether you’re looking for a quick dessert for guests or a family favorite to satisfy your sweet tooth, this recipe truly delivers all the joy of a homemade chocolate cake with zero oven time. It’s the perfect introduction to no-bake creations that impress both in taste and texture.
Ingredients You’ll Need
The magic of Chocolate Biscuit Refrigerator Cake: A No-Bake Delight Recipe lies in its simple yet essential ingredients. Each one plays a crucial role—biscuits create the satisfying crunch, chocolate brings depth and richness, and cream makes the cake luxuriously smooth. These straightforward staples combine effortlessly for a spectacular dessert.
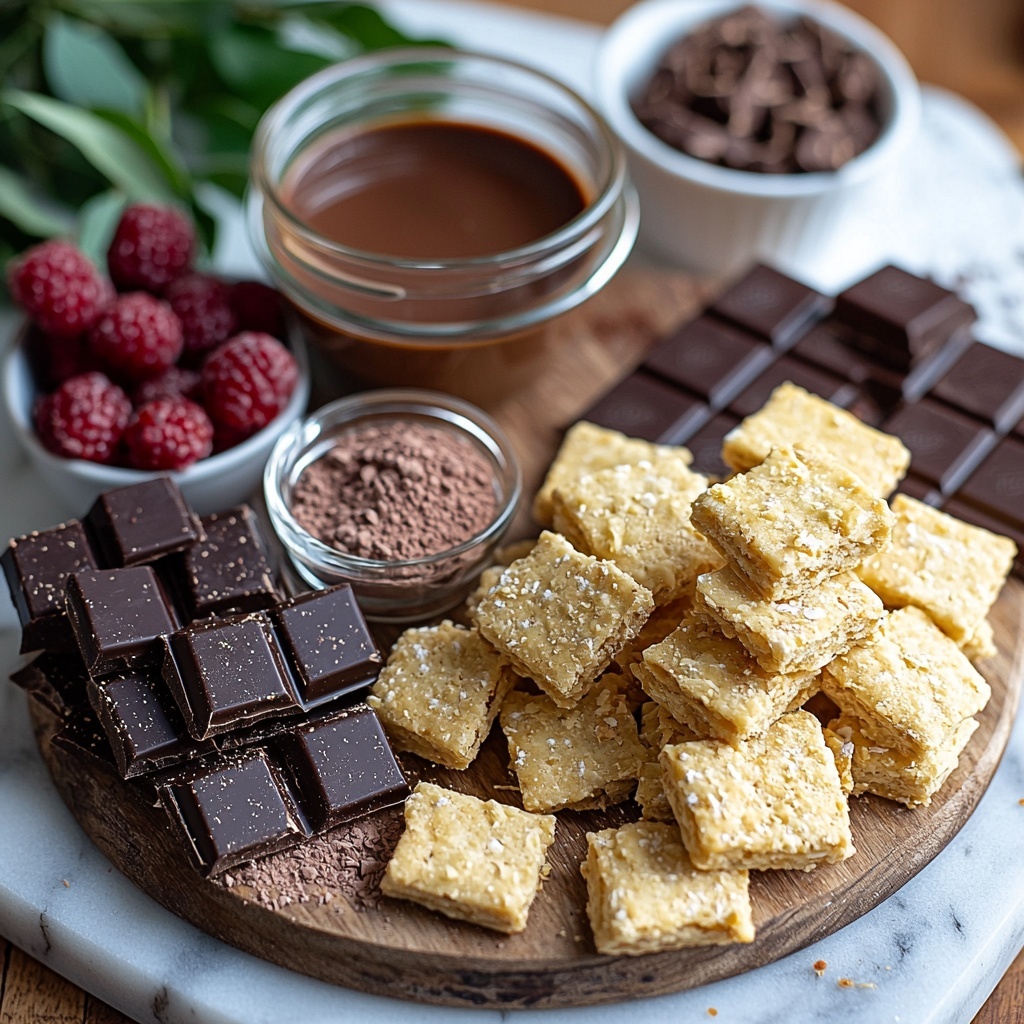
- Digestive biscuits or tea biscuits (400g): These provide the signature crunchy layers that contrast beautifully with the creamy chocolate.
- Unsalted butter (200g, melted): Butter binds the biscuits and adds a velvety richness to the cake’s texture.
- Dark chocolate (200g, chopped): Offers an intense cocoa flavor that is both deep and satisfying.
- Milk chocolate (100g, chopped): Adds a smooth, sweet balance to the bittersweet dark chocolate.
- Heavy cream (1 cup): Whipped cream offers a light, airy touch that makes the cake decadently soft.
- Powdered sugar (1/2 cup): Sweetens the cream perfectly without any graininess.
- Vanilla extract (1 teaspoon): Enhances the chocolate’s richness with warm aromatic notes.
- Chocolate shavings or grated chocolate: For decoration, these add an inviting texture and extra chocolate punch.
- Chopped nuts (optional): Provide crunch and earthy contrast if you love a bit of nuttiness.
- Fresh berries (optional): Add freshness and a pop of color to brighten the final presentation.
How to Make Chocolate Biscuit Refrigerator Cake: A No-Bake Delight Recipe
Step 1: Prepare the Chocolate Mixture
Begin by melting the dark and milk chocolate together in a heatproof bowl over simmering water or gently in the microwave. Stir until smooth and glossy. This luscious chocolate sauce will coat the biscuits and bring them together into a firm yet creamy cake. Let it cool slightly but not harden, so it’s pourable.
Step 2: Whip the Cream
In a separate bowl, beat the heavy cream with the powdered sugar and vanilla extract until soft peaks form. The cream should be light, fluffy, and sweetened just enough to complement the bittersweet chocolate. This whipped cream will create that heavenly melt-in-your-mouth texture that makes this cake so irresistible.
Step 3: Combine Butter and Biscuits
Pour the melted butter over the digestive biscuits in a large mixing bowl and stir until every biscuit is well-coated. This ensures a rich flavor and helps soften the biscuits while keeping their delightful crunch intact once chilled.
Step 4: Layer the Cake
Take a rectangular or loaf pan lined with parchment paper for easy removal. Start layering by spreading a portion of the biscuit mixture at the bottom, followed by a generous layer of the melted chocolate. Then add a layer of whipped cream. Repeat these layers until all ingredients are used, finishing with a smooth cream layer on top.
Step 5: Chill and Set
Cover the cake with cling film and place it in the refrigerator for at least 4 hours, preferably overnight. This resting time allows the biscuits to soften and absorb the creamy chocolate mixture, transforming into a rich, sliceable cake without any baking needed.
How to Serve Chocolate Biscuit Refrigerator Cake: A No-Bake Delight Recipe
Garnishes
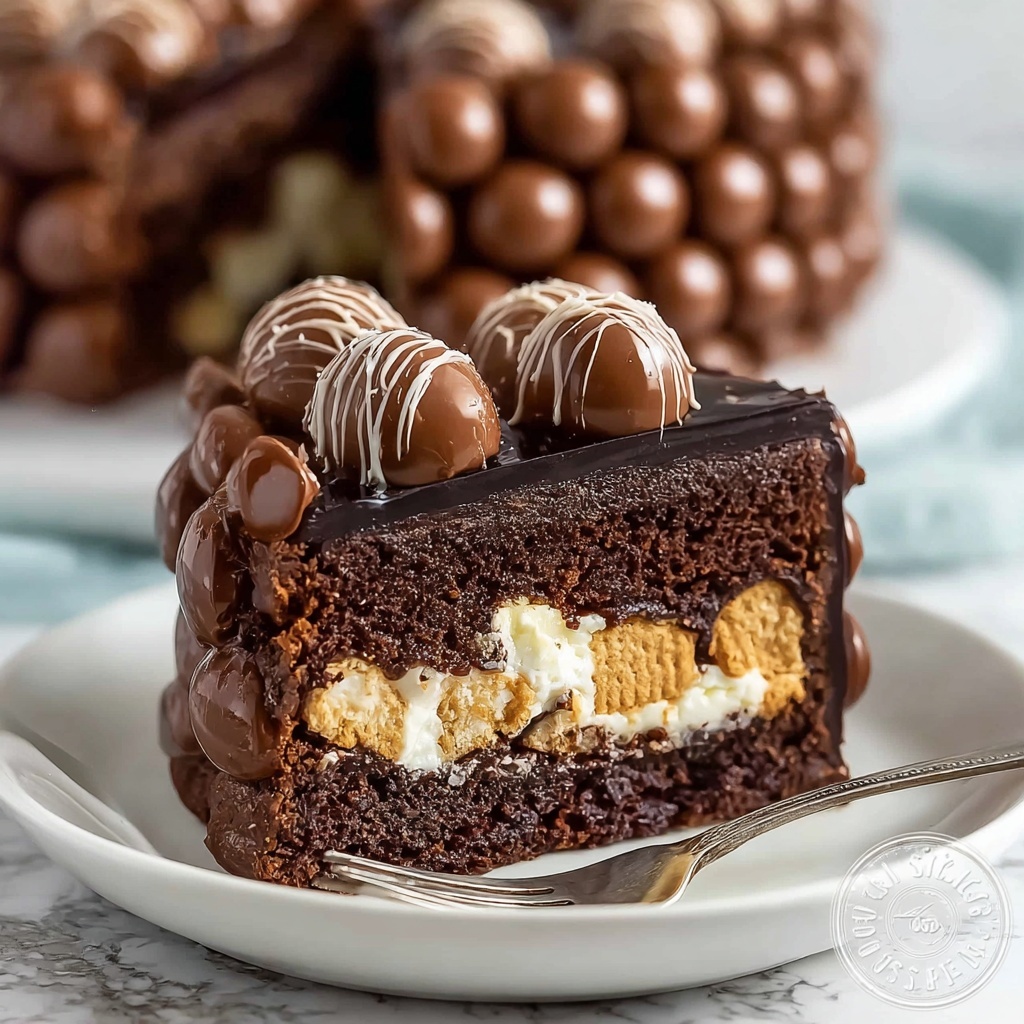
Once chilled and set, your Chocolate Biscuit Refrigerator Cake: A No-Bake Delight Recipe is ready for the finishing touches. Sprinkle chocolate shavings, grated chocolate, or chopped nuts over the top to add texture and visual appeal. If you’re feeling fancy, a handful of fresh berries lends a burst of fruity freshness that complements the richness perfectly.
Side Dishes
Serve this cake alongside a cup of rich coffee or a glass of chilled milk—the kind of pairings that make every bite feel like a moment to savor. Fresh fruit salad also works beautifully, offering acidity that balances the cake’s intense sweetness.
Creative Ways to Present
If you want to impress, slice the cake cleanly and plate each piece with a swirl of whipped cream on the side and a few vibrant berries arranged artistically. For a party, turn this into an individual portion treat by layering the cake mixture into clear glasses or jars, showcasing its attractive layers.
Make Ahead and Storage
Storing Leftovers
Leftover Chocolate Biscuit Refrigerator Cake: A No-Bake Delight Recipe keeps wonderfully in the fridge for up to 4 days. Make sure it’s tightly covered to prevent it from absorbing other odors and drying out. Each slice will remain moist, creamy, and delicious.
Freezing
You can freeze this cake for up to one month by wrapping it securely with plastic wrap and then placing it in an airtight container. Thaw it overnight in the fridge before serving to maintain the perfect texture—it will still taste just as divine after freezing.
Reheating
Since this is a no-bake refrigerator cake, reheating is not necessary or recommended. It is best enjoyed cold or at room temperature to preserve its creamy, crunchy layers and silky texture.
FAQs
Can I use different types of biscuits for this recipe?
Absolutely! While digestive biscuits provide the classic texture and flavor, you can experiment with tea biscuits, graham crackers, or even gluten-free options. Just make sure the biscuits are sturdy enough to hold the layers.
Is there a dairy-free version of Chocolate Biscuit Refrigerator Cake: A No-Bake Delight Recipe?
Yes, simply swap butter with coconut oil and use dairy-free chocolate and cream substitutes. These changes keep the rich texture and flavor while accommodating dietary needs.
How long does it take to prepare this cake?
The hands-on prep is quite quick—usually around 20 to 30 minutes. The majority of the time is the chilling, which is crucial for the cake to set perfectly.
Can I add extra flavors to the cake?
Definitely! Add a teaspoon of instant coffee powder to the melted chocolate for a mocha twist or a splash of orange zest for a citrusy kick. Vanilla extract in the whipped cream also enhances the aroma wonderfully.
What is the best way to slice and serve this cake?
Use a sharp knife dipped in hot water and wiped dry before slicing to get clean, neat pieces. This ensures the layers stay distinct and the cake looks as good as it tastes.
Final Thoughts
Now that you know how easy and delightful the Chocolate Biscuit Refrigerator Cake: A No-Bake Delight Recipe is to make, I truly encourage you to give it a try. It’s a fantastic dessert that feels special with minimal fuss, perfect for sharing with loved ones or treating yourself. Once you make it, you’ll understand why this recipe holds a special place in many hearts—it’s simply irresistible.
Print
Chocolate Biscuit Refrigerator Cake: A No-Bake Delight Recipe
- Prep Time: 20 minutes
- Cook Time: 0 minutes
- Total Time: 4 hours 20 minutes (including chilling time)
- Yield: 8 servings
- Category: Dessert
- Method: No-Cook
- Cuisine: International
- Diet: Gluten Free
Description
Chocolate Biscuit Refrigerator Cake is a rich, no-bake dessert combining layers of crunchy digestive biscuits with smooth, melted dark and milk chocolate, enhanced by whipped cream and a touch of vanilla. Perfect for a quick yet indulgent treat, it requires no oven and sets in the fridge, decorated with chocolate shavings and optional nuts or fresh berries.
Ingredients
For the Cake:
- 400g digestive biscuits or tea biscuits
- 200g unsalted butter, melted
- 200g dark chocolate, chopped
- 100g milk chocolate, chopped
- 1 cup heavy cream
- 1/2 cup powdered sugar
- 1 teaspoon vanilla extract
For Decoration:
- Chocolate shavings or grated chocolate
- Chopped nuts (optional)
- Fresh berries (optional)
Instructions
- Prepare the Biscuits: Break the digestive biscuits into rough pieces by hand or pulse them lightly in a food processor. The pieces should be chunky, not powdered, to maintain a nice texture in the cake.
- Melt the Butter and Chocolate: In a microwave-safe bowl or over a double boiler, melt the unsalted butter and chopped dark and milk chocolates together until fully smooth and combined. Stir well to combine and set aside slightly to cool but not harden.
- Whip the Cream: In a mixing bowl, whip the heavy cream with powdered sugar and vanilla extract until soft peaks form. The cream should be light and airy, providing a rich, creamy contrast to the chocolate and biscuits.
- Combine Chocolate Mixture and Whipped Cream: Gently fold the melted chocolate and butter mixture into the whipped cream, carefully combining without deflating the whipped cream too much. This creates a smooth, rich chocolate filling for the cake.
- Assemble the Cake: In a lined or greased cake tin or loaf pan, spread a thin layer of the chocolate cream mixture. Add a layer of broken biscuits, then spread another layer of the chocolate cream over them. Repeat layering until all biscuits and chocolate cream are used, finishing with the chocolate cream on top.
- Chill the Cake: Cover the cake with plastic wrap and refrigerate for at least 4-6 hours, preferably overnight. This allows the biscuits to soften slightly and the chocolate cream to set, creating a firm but creamy texture.
- Decorate and Serve: Once set, remove the cake from the pan and decorate the top with chocolate shavings, grated chocolate, chopped nuts, or fresh berries as desired. Slice and serve chilled for best texture and flavor.
Notes
- Use gluten-free biscuits to make this recipe gluten free.
- Coconut oil can replace butter for a dairy-free alternative.
- Try semi-sweet or white chocolate instead of dark or milk chocolates for different flavor profiles.
- Ensure not to overmix the whipped cream with chocolate to keep the texture light and airy.
- Allow sufficient chilling time for the best texture—overnight is ideal.


