
There is something truly magical about biting into a batch of Chewy Chocolate Peppermint Cookies for Holiday Magic Recipe. These cookies combine rich, velvety cocoa flavor with refreshing peppermint bits that instantly evoke festive joy. Whether you’re baking for a holiday party or craving a cozy treat, this recipe delivers chewy texture and a perfect balance of chocolatey sweetness with a cool peppermint kick that is simply irresistible.
Ingredients You’ll Need
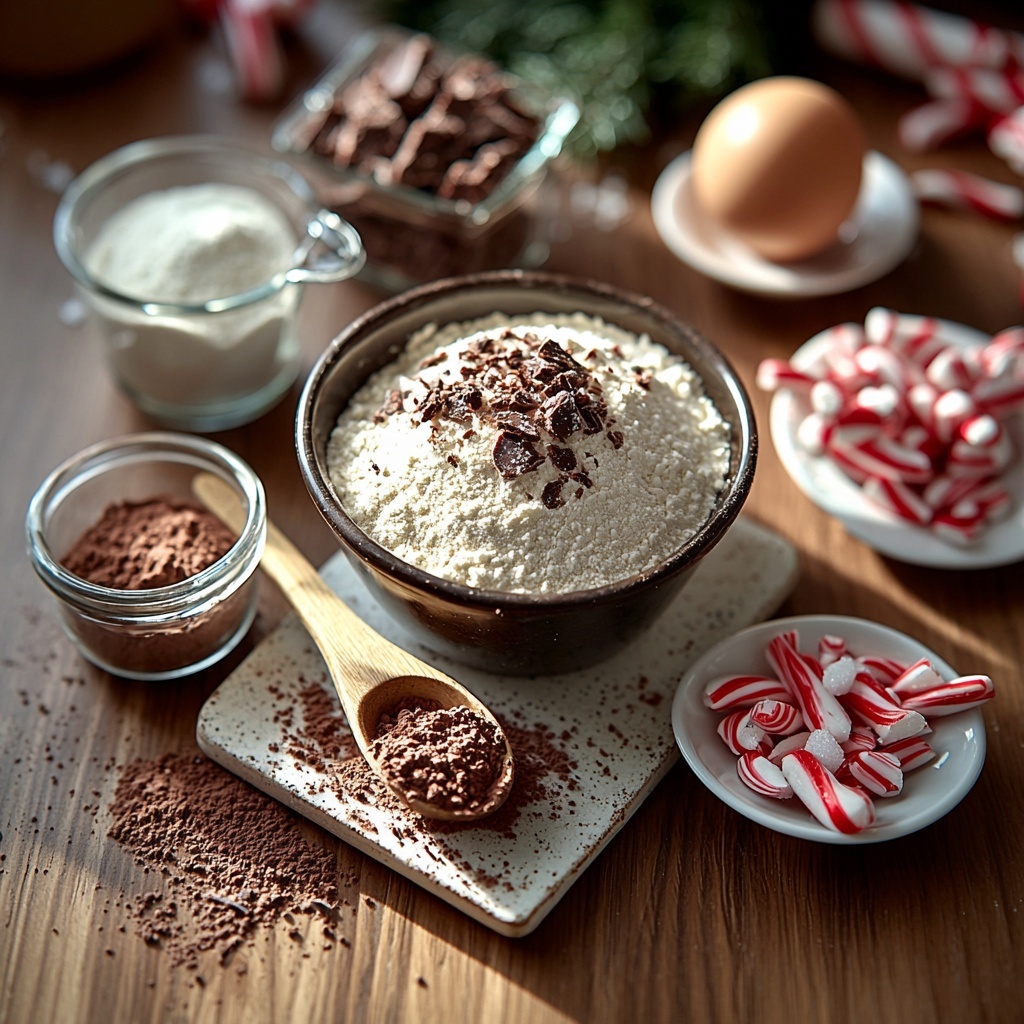
All the ingredients in this recipe are straightforward and pantry-friendly, yet each plays a vital role in creating those classic chewy chocolate peppermint cookies we all adore. From the Dutch-processed cocoa that deepens the chocolate flavor to the fresh baking soda for ideal rise, every element is carefully chosen to build texture, taste, and festive appeal.
- 1.75 cups all-purpose flour: The sturdy base that gives structure while allowing those cookies to remain nicely chewy; gluten-free flour can be swapped in if needed.
- 0.75 cups unsweetened cocoa powder: Dutch-processed cocoa is preferred here for a richer, smoother chocolate depth.
- 0.5 teaspoon baking soda: Ensures your cookies rise just right with a tender crumb—make sure it’s fresh.
- A pinch of salt: Balances sweetness perfectly and enhances the chocolate’s flavor notes beautifully.
- 0.5 cups unsalted butter: Brings creamy richness; margarine works as a dairy-free option.
- 0.5 cups brown sugar: Adds moisture and a subtle caramel undertone to your cookies.
- 0.5 cups granulated sugar: Sweetens without weighing down the dough.
- 1 large egg: Using a room-temperature egg helps everything blend smoothly for tender cookies.
- 1 cup Ghirardelli peppermint bark: Chopped to infuse bursts of creamy peppermint-chocolate goodness in every bite.
- 0.5 cups crushed candy canes: Optional, but these add delightful crunch and extra holiday charm.
How to Make Chewy Chocolate Peppermint Cookies for Holiday Magic Recipe
Step 1: Preheat and Prep
Begin by preheating your oven to 350°F (175°C). While it warms, line your baking sheets with parchment paper—this helps with easy removal and cleanup, plus keeps your cookies perfectly shaped.
Step 2: Mix Dry Ingredients
Whisk together the all-purpose flour, cocoa powder, baking soda, and a pinch of salt in a large bowl. This ensures all your dry ingredients are evenly distributed, preventing any clumps or uneven flavor in your cookies.
Step 3: Cream Butter and Sugars
In a separate bowl, use a mixer to cream the unsalted butter with the brown and granulated sugars until the mixture is light and fluffy—usually about 2 to 3 minutes. This process creates the airy texture that makes your cookies soft and chewy.
Step 4: Add the Egg
Next, add your room-temperature egg into the butter-sugar mixture. Mixing it thoroughly ensures your dough will come together nicely, lending structure without toughness.
Step 5: Combine Wet and Dry Ingredients
Gradually fold the dry ingredients into your wet mixture using a spatula or mixer on low speed. Stir until just combined—overmixing can toughen cookies, so patience here pays off with tender results.
Step 6: Fold in Peppermint Bark
Gently fold in the chopped Ghirardelli peppermint bark pieces, making sure each bit is evenly spread throughout the dough. This adds delightful pockets of creamy mint and chocolate to every bite, upping the holiday magic.
Step 7: Scoop and Sprinkle
Using a tablespoon or small cookie scoop, portion the dough into 1 to 2-tablespoon balls and space them evenly on prepared baking sheets. Before popping into the oven, sprinkle crushed candy canes on top of each ball to add that festive crunch and a pop of color.
Step 8: Bake to Perfection
Bake your cookies for 10 to 12 minutes, or until the edges are set but centers still have a slight softness. This timing locks in that signature chewy texture we all love in holiday cookies.
Step 9: Cool Before Serving
Allow the cookies to cool on the baking sheet for about 5 minutes to firm up before transferring them to a wire rack. Cooling completely helps them hold their shape while keeping that chewiness intact.
How to Serve Chewy Chocolate Peppermint Cookies for Holiday Magic Recipe
Garnishes
A sprinkle of extra crushed candy canes or a gentle dusting of powdered sugar can make your cookies look even more festive. For a fancy touch, try dipping half of each cookie in melted white chocolate and letting it cool for an elegant contrast.
Side Dishes
These peppermint chocolate cookies pair beautifully with a warm mug of spiced hot chocolate, peppermint mocha, or even a simple cup of black coffee to balance the sweetness. For gatherings, a plate alongside some whipped cream or vanilla ice cream enhances the indulgence.
Creative Ways to Present
Stack these cookies tied with a red ribbon as charming gifts, or arrange them on a holiday platter with fresh evergreen sprigs and ornaments to create a stunning centerpiece. You can also sandwich some peppermint cream cheese filling between two cookies for an extra-special treat.
Make Ahead and Storage
Storing Leftovers
You can keep leftover cookies fresh and chewy by storing them in an airtight container at room temperature for up to 5 days. Adding a slice of bread inside the container helps retain moisture and softness.
Freezing
For longer storage, freeze the cookie dough balls on a baking sheet before transferring them to a sealed freezer bag. When ready, bake straight from frozen with a minute or two added to the baking time. Alternatively, baked cookies can be frozen in a single layer with parchment paper between layers.
Reheating
To bring frozen or stored cookies back to life, warm them in a 300°F oven for 5 to 7 minutes or microwave for 15 seconds. Reheating enhances the chewy texture and brings out the peppermint aroma beautifully.
FAQs
Can I use regular cocoa powder instead of Dutch-processed?
Yes, you can substitute regular cocoa powder, but the flavor may be slightly less smooth and rich. Dutch-processed cocoa gives the best depth of flavor in this recipe.
Are these cookies gluten-free?
The original recipe uses all-purpose flour, which contains gluten. However, you can replace it with a gluten-free flour blend that measures cup-for-cup for a similar chewy texture.
Can I make these cookies dairy-free?
Absolutely! Swap the unsalted butter for a dairy-free margarine and check that your peppermint bark is dairy-free or use a suitable chocolate alternative.
Why is the egg used at room temperature?
Using a room-temperature egg helps it mix evenly with the other ingredients, preventing the dough from curdling and ensuring a consistent texture.
What can I substitute for peppermint bark?
If peppermint bark is hard to find, chopped peppermint candies or even Andes mints work well to add peppermint flavor and texture to these cookies.
Final Thoughts
If you’re looking to sprinkle some holiday cheer into your baking routine, the Chewy Chocolate Peppermint Cookies for Holiday Magic Recipe is a must-try. With its perfect chewy texture, rich chocolate, and fresh peppermint zing, it’s a guaranteed crowd-pleaser that fills your kitchen with warmth and festive spirit. I can’t wait for you to try this recipe and experience the holiday magic yourself!
Print
Chewy Chocolate Peppermint Cookies for Holiday Magic Recipe
- Prep Time: 15 minutes
- Cook Time: 12 minutes
- Total Time: 27 minutes
- Yield: 24 servings
- Category: Dessert
- Method: Baking
- Cuisine: American
Description
These chewy chocolate peppermint cookies combine rich cocoa and festive peppermint bark for a delightful holiday treat. Perfectly soft and chewy with a slight crunch from crushed candy canes on top, these cookies bring holiday magic to your cookie jar.
Ingredients
Dry Ingredients
- 1.75 cups all-purpose flour (substitute with gluten-free flour if needed)
- 0.75 cups unsweetened cocoa powder (Dutch-processed for richer taste)
- 0.5 teaspoon baking soda (fresh for optimal rise)
- A pinch of salt
Wet Ingredients
- 0.5 cups unsalted butter (can swap with margarine for dairy-free option)
- 0.5 cups brown sugar
- 0.5 cups granulated sugar
- 1 large egg (room temperature)
Mix-ins & Toppings
- 1 cup Ghirardelli peppermint bark, chopped
- 0.5 cups crushed candy canes (optional or substitute with similar toppings)
Instructions
- Preheat Oven: Preheat your oven to 350°F (175°C) and prepare baking sheets by lining them with parchment paper to prevent sticking.
- Mix Dry Ingredients: In a mixing bowl, whisk together the all-purpose flour, unsweetened cocoa powder, baking soda, and a pinch of salt until evenly combined.
- Cream Butter and Sugars: Using an electric mixer, cream the unsalted butter, brown sugar, and granulated sugar together until the mixture becomes light and fluffy, about 2-3 minutes.
- Add Egg: Incorporate the room-temperature egg into the creamed butter and sugar mixture, mixing thoroughly until fully combined.
- Combine Mixtures: Gradually add the dry ingredients into the wet mixture, stirring gently until just combined to avoid overmixing.
- Add Peppermint Bark: Fold in the chopped Ghirardelli peppermint bark carefully to distribute the chocolate peppermint bits throughout the dough.
- Portion Dough: Scoop portions of dough about 1 to 2 tablespoons each, placing them evenly spaced on the prepared baking sheets.
- Add Candy Cane Topping: Sprinkle crushed candy canes on top of each cookie dough ball for a festive crunch.
- Bake Cookies: Bake in the preheated oven for 10-12 minutes, or until the edges are set but the centers still remain slightly soft to ensure chewiness.
- Cool Cookies: Allow cookies to cool on the baking sheet for about 5 minutes before transferring them to a wire rack to cool completely, helping them set perfectly.
Notes
- For a dairy-free version, substitute butter with margarine or a vegan butter alternative.
- Using Dutch-processed cocoa powder intensifies the chocolate flavor.
- Make sure your baking soda is fresh for proper rising.
- Room temperature eggs mix better with creamed butter and sugar.
- Do not overmix the dough once dry ingredients are added to maintain a tender texture.
- Crushed candy canes on top add a crunchy peppermint burst, but they are optional and can be substituted with other crushed candies.
- Allow cookies to cool slightly on the tray to avoid breaking during transfer.


