“`html
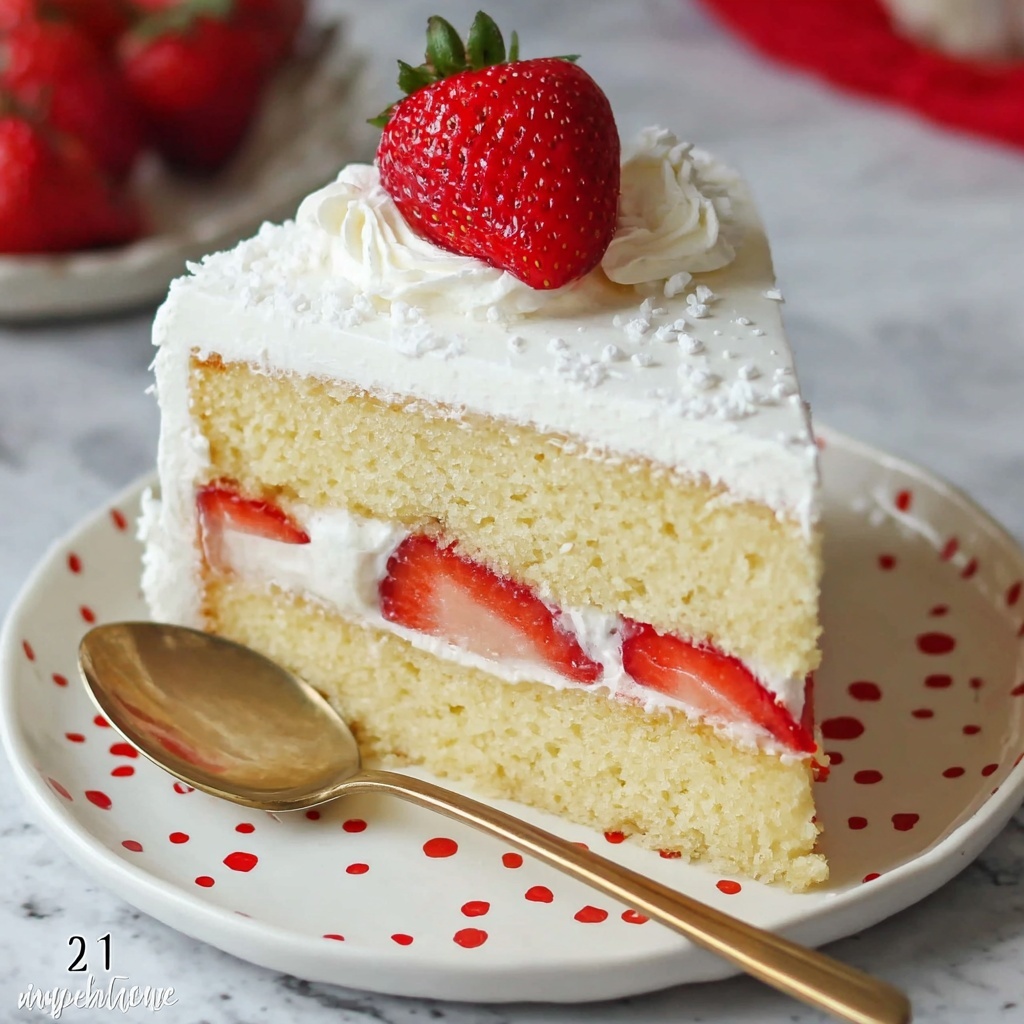
If you’ve ever wanted to experience the delicate, melt-in-your-mouth magic that is a classic Japanese strawberry shortcake, you’re in for a treat with this Japanese Strawberry Cake Recipe. This beautiful cake brings together a light, airy sponge layered with luscious whipped cream and sweet, juicy strawberries, creating the perfect balance of flavor, texture, and visual delight. Whether you’re celebrating a special occasion or simply craving a slice of pure happiness, this recipe will guide you step-by-step to crafting a stunning cake that’s just as impressive as it is delicious.
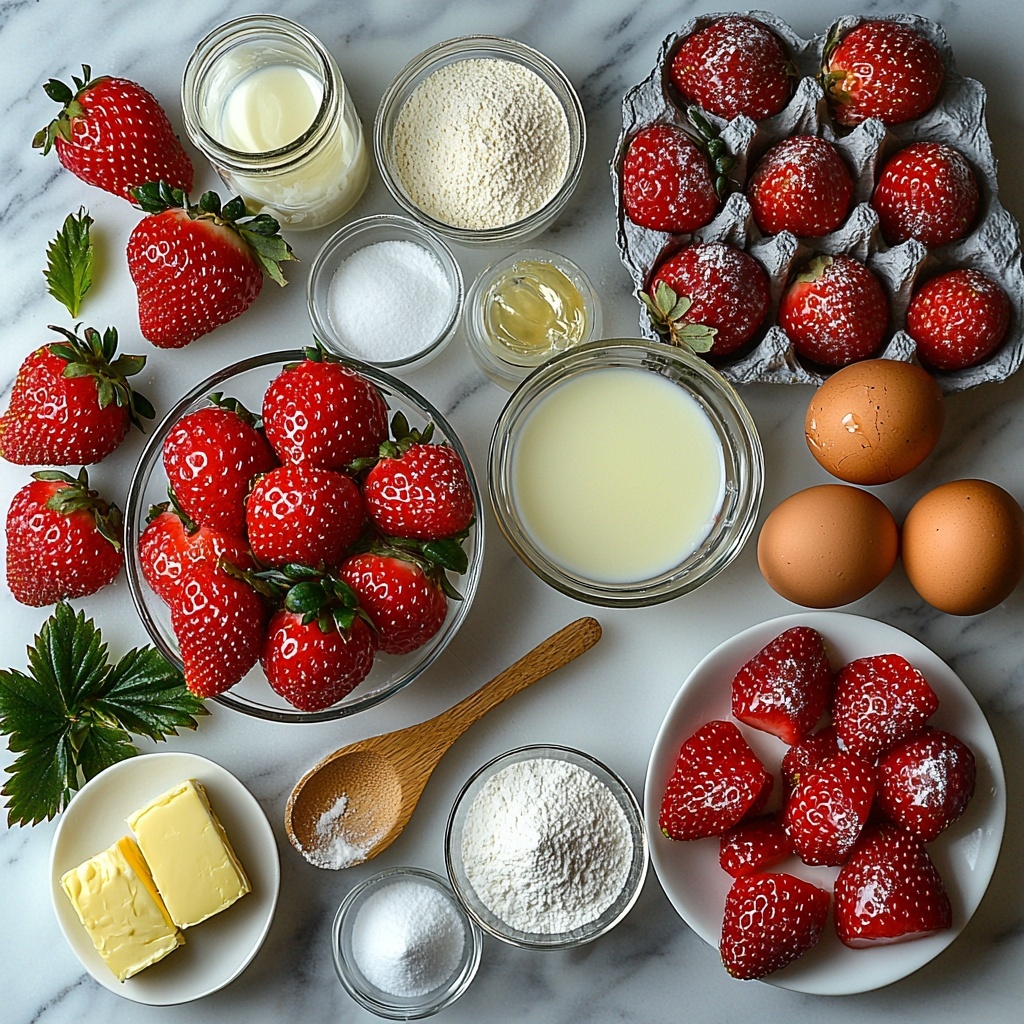
Ingredients You’ll Need
Surprisingly simple, yet essential ingredients come together to create this iconic cake. Each ingredient plays a key role: from the tender crumb of the cake flour to the rich creaminess of the heavy whipping cream, and of course, the sweet freshness of ripe strawberries that make every bite shine.
- 80 g (1/3 cup) whole milk: Adds moisture and richness to the cake batter.
- 50 g (3 1/2 tablespoons) unsalted butter: Brings a subtle buttery flavor and delicate crumb.
- 75 g (1/2 cup + 1/2 tablespoon) cake flour: The secret to the cake’s soft, tender texture.
- 4 large egg yolks: Helps bind the batter while contributing to richness.
- 4 large egg whites: Beaten into fluffy peaks to give the cake its iconic lightness.
- 70 g (5 1/2 tablespoons) sugar (caster sugar if available): Sweetens and stabilizes the egg whites for volume.
- 12 oz to 1 lb (340 g to 450 g) strawberries, divided: Provides the fresh fruity flavor and decorative appeal.
- 1 1/2 teaspoons sugar: Macerates the sliced strawberries, enhancing juiciness.
- 280 g (10 oz) heavy whipping cream: Whipped to fluffy perfection for luscious layers.
- 2 tablespoons confectioners sugar: Sweetens the whipped cream without grit.
- 3/4 teaspoon gelatin (optional, for stabilized cream): Keeps the whipped cream stable if you want a firmer texture.
- 2 tablespoons cold water (optional, for gelatin): Helps dissolve the gelatin smoothly.
- 2 tablespoons sugar: For making the cake syrup that keeps layers moist.
- 3 tablespoons hot water: Dissolves sugar into a perfect soaking syrup.
How to Make Japanese Strawberry Cake Recipe
Step 1: Prepare the Cake Pan
Start by lining an 8-inch round cake pan with parchment paper to prevent sticking and ensure an easy release. Preheat your oven to 325°F (160°C). Prepare a water bath by setting a larger baking dish filled with hot water to provide gentle, even baking, crucial for this delicate cake. If you use a removable-bottom pan, wrap the outside tightly in foil to prevent water leakage into the batter.
Step 2: Make the Batter
In a heatproof bowl, melt the milk and butter together in the microwave, stirring until fully combined. Sift the cake flour over this mixture and fold gently to avoid lumps. Next, add the egg yolks and incorporate thoroughly until the batter is smooth and silky.
Step 3: Beat the Egg Whites
Using a clean bowl and mixer, whip the egg whites on medium-high speed until they become frothy. Gradually add the sugar a little at a time and continue beating until glossy medium peaks form—these fluffy whites are what give our cake that signature airy structure.
Step 4: Combine Mixtures
Carefully fold a quarter of the whipped egg whites into the yolk mixture to lighten it, then gently pour this back into the remaining whites. Use a spatula to fold until just combined, being mindful not to overmix and deflate the airy batter.
Step 5: Bake
Pour the batter into your prepared pan and tap it lightly on the counter to release any large air bubbles. Place the cake pan into the water bath and bake for 1 hour and 30 minutes, or until the cake is set and a skewer inserted in the center comes out clean. Once baked, let the cake cool completely on a rack before assembling.
Step 6: Macerate Strawberries
While the cake cools, slice about half of your strawberries (around 8 oz or 225 g) and toss them with 1 1/2 teaspoons of sugar. Let these sit for 1 to 2 hours to soften and release their sweet juice. Reserve the resulting syrupy juice to enhance flavor in other components.
Step 7: Make Syrup
Dissolve 2 tablespoons of sugar in 3 tablespoons of hot water to create a simple syrup for moistening the cake layers. For an extra burst of strawberry flavor, whisk in a splash of the reserved strawberry juice from maceration.
Step 8: Prepare Whipped Cream
Whip the heavy cream with sifted confectioners sugar until firm peaks form. For a creamier, more stable frosting, you can bloom gelatin in cold water, melt it gently, and fold it into the softly whipped cream before finishing to soft peaks. This optional step ensures your cream holds its shape beautifully over time.
Step 9: Slice and Soak Cake Layers
Once the cake is completely cool, trim off the browned top layer to reveal the soft crumb beneath. Using a serrated knife, slice the cake horizontally into two even layers. Generously brush each cut surface with your freshly made syrup to lock in moisture and add subtle sweetness.
Step 10: Assemble Layers
Place the bottom cake layer on your serving plate or cake stand. Spread a delicate layer of whipped cream over it, then arrange a generous helping of the macerated strawberry slices on top. Add another layer of cream to hold the berries in place, then gently place the second cake layer on top. Don’t forget to brush it with more syrup for extra tenderness.
Step 11: Frost and Decorate
Apply a thin crumb coat of whipped cream all over to trap loose crumbs, then generously frost the entire cake with the remaining cream. Use a piping bag filled with extra whipped cream to add pretty decorative touches if you like. Finally, crown your creation with reserved whole or halved strawberries for that stunning fresh pop of color.
Step 12: Chill and Serve
If you made stabilized cream with gelatin, chill the cake uncovered in the refrigerator for at least 30 minutes to let it set perfectly. Otherwise, you can serve it right away or within a few hours. For the best experience, slice and enjoy the cake at room temperature to appreciate its light texture and fresh flavors fully.
How to Serve Japanese Strawberry Cake Recipe
Garnishes
Layer your Japanese Strawberry Cake with extra whole berries, small edible flowers, or a dusting of powdered sugar to enhance its beauty. Mint leaves create a lovely fresh contrast to the sweetness, making every slice as delightful to the eyes as it is to the palate.
Side Dishes
This cake pairs wonderfully with light accompaniments like a crisp green tea or a mild jasmine tea. For a more indulgent experience, serve alongside a scoop of vanilla bean ice cream or a drizzle of warm berry coulis to complement the strawberry flavors.
Creative Ways to Present
Elevate your presentation by serving individual slices on delicate dessert plates with a small dollop of whipped cream and a single strawberry fan on top. Alternatively, assemble this cake as mini individual trifles in clear glass cups, layering cake, cream, and berries for a charming and elegant dessert.
Make Ahead and Storage
Storing Leftovers
Keep your Japanese Strawberry Cake refrigerated in an airtight container for up to 3-4 days. This helps preserve the freshness of the cream and strawberries while maintaining the cake’s delicate texture.
Freezing
While freezing is possible, the whipped cream and fresh strawberries may lose some texture upon thawing. If you choose to freeze, wrap the cake tightly in plastic wrap and foil, and consume within 1 month. Thaw overnight in the refrigerator to minimize moisture loss, then whip fresh cream for serving if desired.
Reheating
This cake is best enjoyed chilled or at room temperature. Avoid reheating as the cream will melt and the delicate sponge may become soggy. Simply take it out of the fridge about 30 minutes before serving to let it gently come to the ideal temperature.
FAQs
Can I use frozen strawberries for this Japanese Strawberry Cake Recipe?
Fresh strawberries are best for texture and sweetness, but if frozen are your only option, thaw and drain them well before macerating to avoid excess moisture that can affect the cake layers.
What makes this cake “Japanese” compared to other strawberry cakes?
The hallmark of a Japanese Strawberry Cake is its incredibly light, fluffy sponge combined with lightly sweetened whipped cream and fresh strawberries, creating a delicate balance rather than an overly sweet or dense dessert.
Is gelatin necessary for the whipped cream?
Gelatin is optional but recommended if you want stabilized cream that holds its shape longer, especially for decorating or if the cake will be sitting out for extended periods.
Can I make this cake gluten-free?
You can experiment by substituting a gluten-free cake flour blend, but be mindful that texture and rise may vary. Japanese sponge cakes rely heavily on the structure provided by cake flour for their characteristic softness.
How long does it take to make this cake from start to finish?
The entire Japanese Strawberry Cake Recipe takes about 3 hours and 30 minutes, including baking, cooling, macerating strawberries, and assembling the layers for best results.
Final Thoughts
There’s something truly special about creating a Japanese Strawberry Cake Recipe from scratch—the tender sponge, the whipped cream, and those juicy strawberries come together like a beautiful symphony of flavors and textures. It’s a dessert that not only tastes spectacular but looks stunning enough to impress family and friends. Don’t hesitate to give this classic a try; it might just become your new favorite cake to bake and share!
“`
Print
Japanese Strawberry Cake Recipe
- Prep Time: 30 minutes
- Cook Time: 1 hour 30 minutes
- Total Time: 3 hours 30 minutes
- Yield: 8 servings
- Category: Dessert
- Method: Baking
- Cuisine: Japanese
- Diet: Vegetarian
Description
This Japanese Strawberry Cake is a light and airy sponge cake layered with sweetened whipped cream and fresh macerated strawberries. The cake is gently baked in a water bath to achieve its moist, delicate texture and is decorated with luscious whipped cream and vibrant strawberries for an elegant dessert perfect for special occasions or a delightful treat.
Ingredients
Cake Batter
- 80 g (1/3 cup) whole milk
- 50 g (3 1/2 tablespoons) unsalted butter
- 75 g (1/2 cup + 1/2 tablespoon) cake flour
- 4 large egg yolks
- 4 large egg whites
- 70 g (5 1/2 tablespoons) sugar (caster sugar if available)
Strawberries and Syrup
- 12 oz to 1 lb (340 g to 450 g) strawberries, divided
- 1 1/2 teaspoons sugar (for macerating strawberries)
- 2 tablespoons sugar (for syrup)
- 3 tablespoons hot water (for syrup)
Whipped Cream
- 280 g (10 oz) heavy whipping cream
- 2 tablespoons confectioners sugar
- 3/4 teaspoon gelatin (optional, for stabilized cream)
- 2 tablespoons cold water (optional, for gelatin)
Instructions
- Prepare the Cake Pan: Line the bottom of an 8-inch round cake pan with parchment paper and wrap it in foil to prevent leaks if using a springform pan. Preheat the oven to 325°F (160°C). Prepare a high-walled pan or baking dish for a water bath to ensure gentle baking.
- Make the Batter: In a medium heatproof bowl, melt the butter in milk using a microwave, then sift in the cake flour and mix gently. Add egg yolks and combine until smooth and cohesive.
- Beat the Egg Whites: Using a mixer at medium-high speed, beat the egg whites until frothy. Gradually add sugar and continue beating until glossy medium peaks form.
- Combine Mixtures: Fold 1/4 of the whipped egg whites into the yolk mixture to lighten it. Pour that mixture back into the remaining whites and gently fold together until just incorporated, being careful not to overmix.
- Bake: Pour the batter into the lined cake pan, tap to release large air bubbles. Place the pan into the prepared water bath with hot water about 1 inch up the pan sides. Bake for 1 hour 30 minutes or until set and a skewer inserted comes out clean. Cool completely on a rack.
- Macerate Strawberries: Slice about 8 oz (225 g) of strawberries and toss with 1 1/2 teaspoons sugar. Let sit for 1 to 2 hours until juicy and reserve the juice.
- Make Syrup: Dissolve 2 tablespoons sugar in 3 tablespoons hot water, then optionally whisk in some reserved strawberry juice to enhance flavor.
- Prepare Whipped Cream: For regular cream: whip heavy cream with confectioners sugar until firm peaks form. For stabilized cream: bloom gelatin in cold water, melt it, then add to softly whipped cream and whip to soft peaks.
- Slice and Soak Cake Layers: When cooled, slice off the browned top, cut the cake horizontally into two layers, and brush both exposed surfaces generously with the prepared syrup.
- Assemble Layers: Place the bottom layer on a cake stand, spread a thin layer of whipped cream, evenly top with macerated strawberry slices, then cover with more whipped cream. Place the second cake layer on top and brush it with syrup.
- Frost and Decorate: Apply a thin crumb coat of whipped cream over the entire cake to seal crumbs, then apply a thicker final layer all around. Use leftover cream in a piping bag to decorate if desired, and top with reserved whole or halved strawberries.
- Chill and Serve: If using stabilized cream, refrigerate uncovered for at least 30 minutes to set. Otherwise, serve immediately or within a few hours. Slice and enjoy at room temperature for the best texture and flavor.
Notes
- Using a water bath during baking ensures a moist and delicate sponge cake by providing gentle, even heat.
- For a lighter whipped cream that holds shape better, gelatin stabilization is recommended.
- Allowing macerated strawberries to sit enhances their juiciness and flavor.
- Removing the browned cake top before slicing ensures an even surface and uniform layers.
- Serving the cake at room temperature brings out the best texture and flavor profile.


