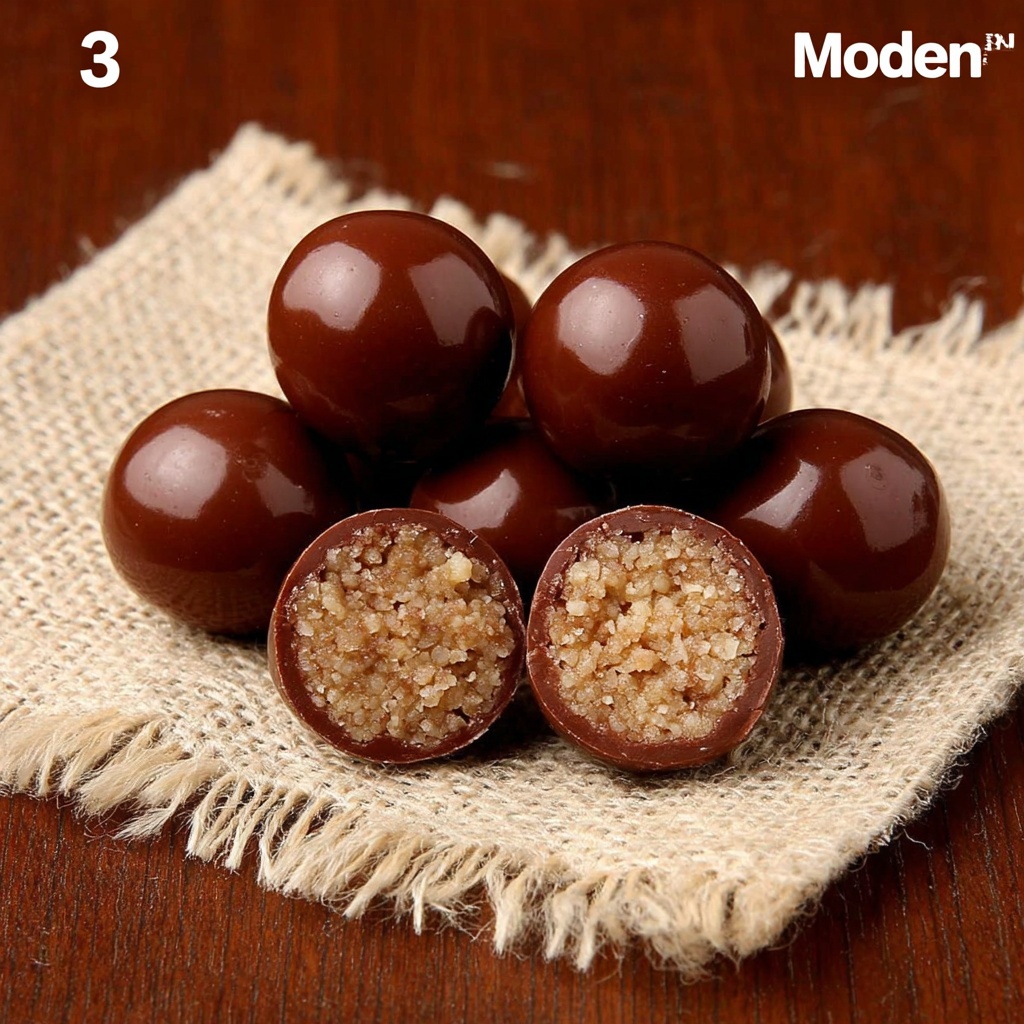
If you have a sweet tooth and love a crunchy, chocolaty treat with a nostalgic twist, this Malted Milk Balls Recipe is about to become your new favorite. These bite-sized delights combine the malty richness that melts in your mouth with a smooth chocolate coating that adds just the right amount of snap. Whether you’re making them for a gathering, a cozy snack, or gifting them to friends, these homemade malted milk balls will feel extra special because you made them yourself. The balance of malted milk powder and cocoa creates a unique flavor profile that is simply irresistible, making this recipe one to cherish and revisit time and again.
Ingredients You’ll Need
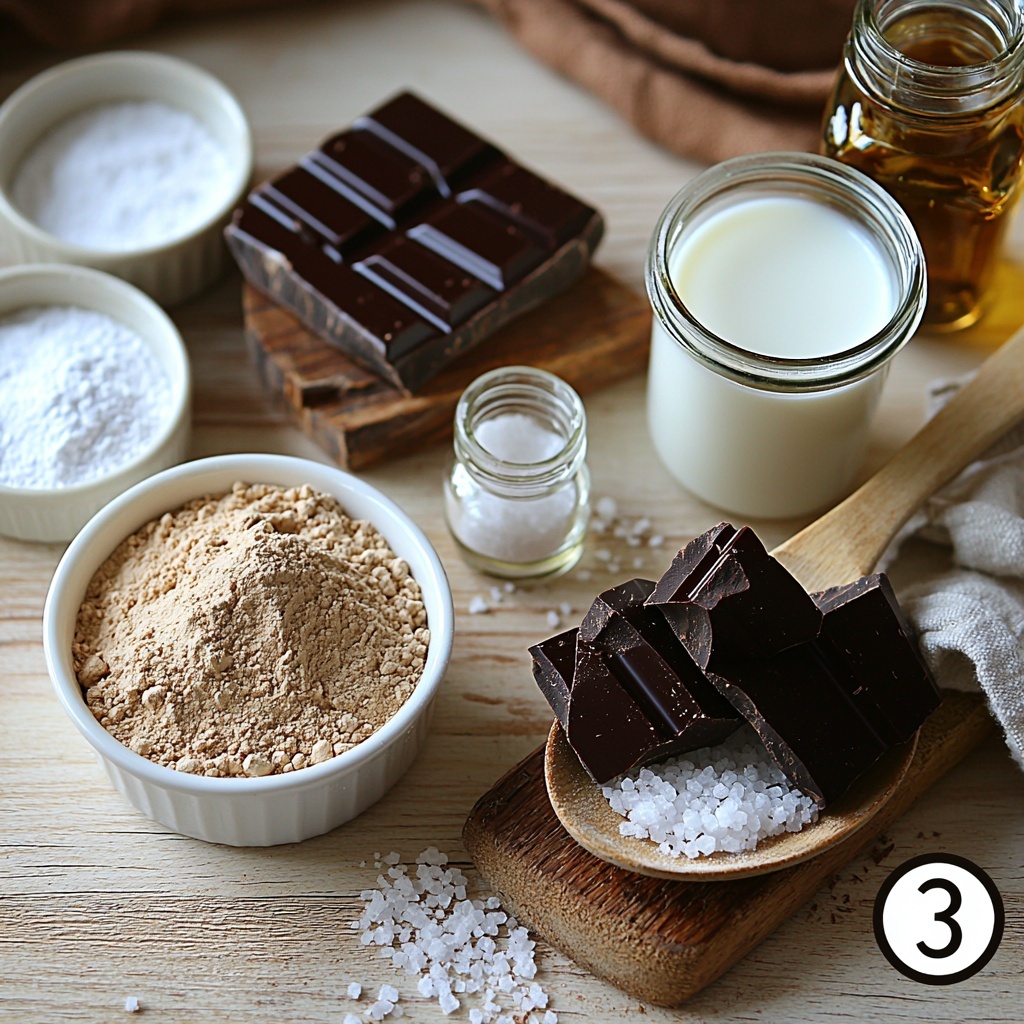
Gathering the right ingredients is the first step to mastering this Malted Milk Balls Recipe. Each component plays a starring role, from the malted milk powder that brings that classic malt flavor, to the cocoa powder that deeply enriches the chocolate taste, creating a perfect harmony of textures and colors.
- 1 cup malted milk powder: This is the star ingredient that provides that signature malt flavor and a lovely, light texture.
- 1/2 cup powdered sugar: Adds sweetness and helps smooth out the mixture without graininess.
- 1/2 cup cocoa powder: Brings rich chocolaty depth and color to the malted treat.
- 1/2 teaspoon salt: Enhances sweetness and balances the flavors beautifully.
- 1/2 cup milk: Binds the dry ingredients together while adding creaminess.
- 1 tablespoon vanilla extract: Infuses warming, aromatic notes that elevate the overall flavor.
- Chocolate (approximately 6 ounces): Needed to coat the malted balls, offering that luscious outer shell.
How to Make Malted Milk Balls Recipe
Step 1: Mix Dry Ingredients
Start by whisking together the malted milk powder, powdered sugar, cocoa powder, and salt in a bowl until they’re well combined. This step ensures that every bite gets that deliciously balanced flavor and a smooth texture without clumps.
Step 2: Combine Wet Ingredients
In a separate bowl, give the milk and vanilla extract a thorough whisking. This blends the creamy and aromatic elements so that when they’re added to the dry mix, everything melds together seamlessly.
Step 3: Form Dough
Pour the wet ingredients into the dry mixture and stir steadily until you get a smooth, lump-free dough. It’s like magic how these simple things join to form a moldable, flavorful base for your malted balls.
Step 4: Chill Mixture
Pop the dough into the refrigerator for 30 minutes to chill. This step firms up the mixture, making it much easier and less messy to shape the malted milk balls later on.
Step 5: Shape Balls
Once chilled, roll the mixture into small balls about 1 inch in diameter. Whether you use a spoon or just your hands, try to keep the shapes uniform so they coat and freeze evenly.
Step 6: Freeze Balls
Lay the shaped balls on parchment paper lined baking sheets and freeze them for 30 minutes. This quick freeze locks their shape, prepping them perfectly for the chocolate coating.
Step 7: Melt Chocolate
Gently melt your chocolate in a double boiler or microwave. Stir continuously until smooth and luscious, making it perfect for dipping.
Step 8: Coat Balls
Dip each firm malted ball into the melted chocolate, ensuring an even, full coating. Place them back on the parchment paper—this part is all about patience and care to get a glossy, appetizing shell.
Step 9: Final Freeze
Pop the chocolate-coated balls back into the freezer for an additional 30 minutes. This final freeze solidifies the chocolate shell, giving you that satisfying snap when you bite into them.
How to Serve Malted Milk Balls Recipe
Garnishes
For a fun and decorative touch, sprinkle the freshly coated malted milk balls with a tiny pinch of sea salt or crushed nuts just after dipping and before the final freezer step. This adds texture contrast and a hint of flavor complexity that will impress your guests.
Side Dishes
These malted milk balls are perfect companions to a hot cup of coffee or a cold glass of milk. They also pair wonderfully with vanilla ice cream or a rich chocolate mousse if you want to create a dessert platter that dazzles.
Creative Ways to Present
Try serving them in small decorative paper cups or arrange them on a pretty plate lined with doilies for a party. For gifting, place them in a cute box with a ribbon—nothing beats the charm of homemade chocolates wrapped with love.
Make Ahead and Storage
Storing Leftovers
Keep your Malted Milk Balls fresh by storing them in an airtight container in the refrigerator. They will stay perfectly tasty and maintain their texture for up to 2 weeks, making them a great make-ahead treat to enjoy over time.
Freezing
You can also freeze the malted milk balls for longer storage. Place them in an airtight container or freezer bag, separating layers with parchment paper, and freeze for up to 3 months. When ready to enjoy, thaw them overnight in the fridge for the best texture.
Reheating
Since these are best served chilled or at room temperature, reheating isn’t necessary. If the chocolate feels too firm after refrigeration or freezing, simply leave the balls out at room temperature for 10-15 minutes before serving to soften slightly.
FAQs
What can I use instead of malted milk powder?
If you don’t have malted milk powder, you can try substituting with a combination of powdered milk and a small amount of malted barley powder if available, but the classic malt flavor might be slightly less pronounced.
Can I use dark or white chocolate to coat the balls?
Absolutely! Dark chocolate offers a richer contrast to the malted centers, while white chocolate provides a sweeter, creamier shell. Feel free to experiment to find your favorite pairing.
How do I prevent the chocolate coating from melting too quickly?
Make sure to temper the chocolate properly or chill the coated balls thoroughly in the freezer. Also, avoid handling them with warm hands to keep that crisp coating intact longer.
Are these malted milk balls gluten-free?
This recipe is naturally gluten-free as long as the malted milk powder you use does not contain any gluten additives. Always double-check labels if you have dietary restrictions.
Can I add flavors or mix-ins to the dough?
Definitely! A pinch of cinnamon or a hint of coffee powder can elevate the flavor. For texture, finely chopped nuts or crushed candy canes make delightful additions.
Final Thoughts
Making your own Malted Milk Balls Recipe is such an enjoyable and rewarding experience, especially when you taste that first perfect bite of malty, chocolaty goodness. These treats are simple, yet packed with flavor and character, making them a wonderful gift or personal indulgence. Once you try this recipe, I’m sure it will become a beloved classic in your kitchen too.
Print
Malted Milk Balls Recipe
- Prep Time: 15 minutes
- Cook Time: 0 minutes
- Total Time: 45 minutes
- Yield: 24 servings
- Category: Dessert
- Method: No-Cook
- Cuisine: American
Description
Delightfully rich and crunchy Malted Milk Balls coated with smooth chocolate, perfect as a nostalgic homemade treat or a sweet gift. This recipe combines malted milk powder, cocoa, and vanilla to create a velvety dough that is chilled, shaped into bite-sized balls, and dipped in melted chocolate for an irresistible finish.
Ingredients
Dry Ingredients
- 1 cup malted milk powder
- 1/2 cup powdered sugar
- 1/2 cup cocoa powder
- 1/2 teaspoon salt
Wet Ingredients
- 1/2 cup milk
- 1 tablespoon vanilla extract
Coating
- Approximately 6 ounces chocolate (quantity enough to coat balls)
Instructions
- Mix Dry Ingredients: In a bowl, whisk together the malted milk powder, powdered sugar, cocoa powder, and salt until well combined and smooth.
- Combine Wet Ingredients: In a separate bowl, whisk together the milk and vanilla extract thoroughly to blend the flavors evenly.
- Form Dough: Add the wet ingredients to the dry ingredients and stir until a uniform mixture forms with no lumps.
- Chill Mixture: Place the mixture in the refrigerator for 30 minutes to firm up, making it easier to shape.
- Shape Balls: Once firm, use a spoon or clean hands to roll the mixture into small balls approximately 1 inch in diameter.
- Freeze Balls: Arrange the balls on a parchment paper-lined baking sheet and freeze them for 30 minutes to solidify their shape before coating.
- Melt Chocolate: Gently melt the chocolate in a double boiler or microwave-safe bowl, stirring frequently until smooth and fully melted.
- Coat Balls: Dip each chilled ball into the melted chocolate, ensuring a full and even coating, then place them back onto the parchment paper.
- Final Freeze: Freeze the coated balls for an additional 30 minutes or until the chocolate has hardened completely.
- Store: Keep the finished malted milk balls in an airtight container in the refrigerator for up to 2 weeks to maintain freshness.
Notes
- For best results, use good quality chocolate for coating to achieve a smooth, shiny finish.
- If the dough is too sticky, chill longer or dust your hands with powdered sugar while shaping.
- You can customize the flavor by adding a pinch of cinnamon or espresso powder to the dry ingredients.
- Store the malted milk balls in the refrigerator as they can soften at room temperature due to the chocolate coating.
- Use parchment paper to prevent sticking during freezing and coating stages.
