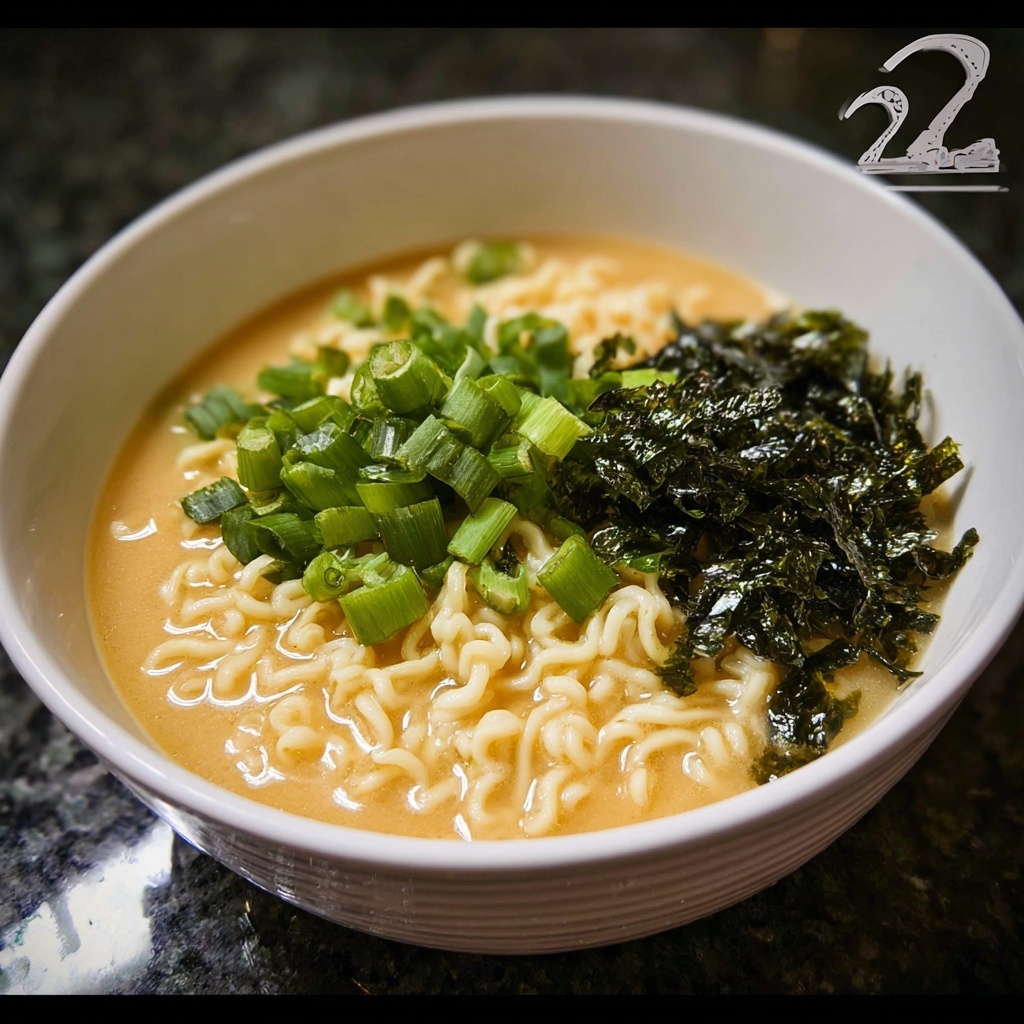
If you’re craving something deeply comforting but delightfully simple, this Salt Ramen Recipe is an absolute game-changer. Imagine a clear, flavorful broth seasoned just right with salt, soy sauce, and sesame oil, gently hugging perfectly cooked ramen noodles. Topped with fresh green onions and crisp nori, every spoonful feels like a warm, soothing hug on a chilly day. It’s incredible how such humble ingredients come together to create a bowl that’s both light and satisfying, perfect for a quick meal that still feels special.
Ingredients You’ll Need
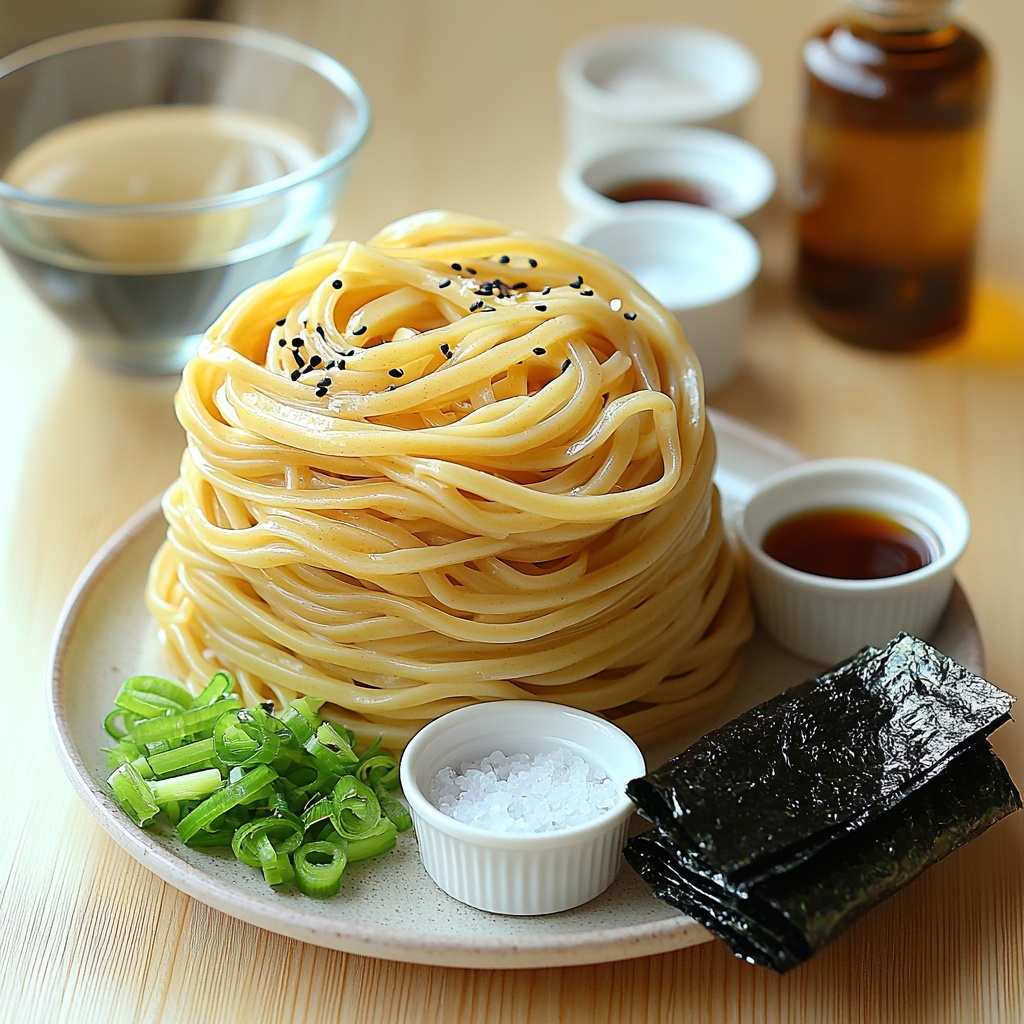
Getting this Salt Ramen Recipe right is all about using straightforward ingredients that each play a vital role. Every component adds its own touch—whether it’s flavor, texture, or a pop of color—to make your bowl just right.
- 4 cups water: This is the base of your broth, giving it a clean, clear canvas for all the flavors to mingle.
- 2 tsp salt: Essential for seasoning, it brings out the natural tastes in the broth without overwhelming it.
- 1 tsp soy sauce: Adds a subtle umami richness and a hint of color to your soup.
- 1 tsp sesame oil: This infuses the broth with a delicate nutty aroma that’s simply irresistible.
- 200 g ramen noodles: The star of the dish, these noodles are springy and soak up the broth perfectly.
- 2 green onions (chopped): Fresh and mild, these add vibrant color and a crisp, oniony bite.
- 2 slices nori (dried seaweed): Adds a touch of briny, oceanic flavor and a bit of textural contrast.
How to Make Salt Ramen Recipe
Step 1: Prepare the Broth
Start by bringing 4 cups of water to a rolling boil in a medium pot. Once you have that nice bubble going, stir in the salt, soy sauce, and sesame oil. Each of these seasonings blends together to create a delicate but flavorful broth that forms the soul of this Salt Ramen Recipe.
Step 2: Cook the Ramen Noodles
Next, add your ramen noodles to the boiling broth or cook them separately according to the package instructions. The goal is to achieve that perfect chewy texture that ramen is known for. Once the noodles are tender but still springy, drain them well so they won’t dilute the broth when combined.
Step 3: Assemble the Bowl
Divide the cooked noodles into bowls, then ladle the hot broth over them. This step warms everything through and, best of all, fills your kitchen with that comforting aroma that only ramen can deliver. Now you’re almost ready for the final touches!
Step 4: Add the Toppings
Top each bowl generously with the chopped green onions and slices of nori. These little additions brighten the dish with freshness and a hint of the sea, making your Salt Ramen Recipe feel authentically satisfying.
How to Serve Salt Ramen Recipe
Garnishes
While the basic garnishes of green onions and nori are spot on, feel free to jazz things up with a soft-boiled egg, a sprinkle of toasted sesame seeds, or even a few chili flakes if you want a gentle kick. These toppings not only add layers of flavor but also bring extra texture and visual appeal.
Side Dishes
Salt Ramen pairs beautifully with light sides that won’t overshadow its delicate broth. Think simple cucumber salad, pickled veggies, or even steamed dumplings. These sides complement the ramen’s clean flavors and make the entire meal more rounded and festive.
Creative Ways to Present
For a fun twist, try serving your Salt Ramen Recipe in individual small bowls as part of a ramen tasting experience. You can also arrange the toppings artistically—like fanning out the nori or neatly layering the green onions—to make every bowl a little work of art. Presentation can bring a whole new level of joy to enjoying this humble dish.
Make Ahead and Storage
Storing Leftovers
If you happen to have leftovers, store the broth and noodles separately in airtight containers to keep their textures intact. The broth can stay fresh in the refrigerator for up to three days, while noodles are best eaten within that time to avoid becoming mushy.
Freezing
Freezing isn’t ideal for ramen noodles, as they tend to lose their chewiness after thawing. However, you can freeze the broth on its own for up to a month. When you’re ready to eat, simply thaw the broth, reheat it, and cook fresh noodles for the best experience.
Reheating
When reheating, warm the broth gently on the stove without boiling to preserve its delicate flavors. If your noodles were stored separately, add them to the hot broth just before serving to keep their texture perfect. This way, your Salt Ramen Recipe tastes almost as fresh as when first made.
FAQs
Can I use other types of noodles in this Salt Ramen Recipe?
Absolutely! While ramen noodles are traditional, you can substitute soba, udon, or even thin spaghetti in a pinch. Just keep in mind that cooking times and textures will vary slightly, but the broth flavors will still shine through.
Is this Salt Ramen Recipe spicy?
No, this recipe is naturally mild and highlights clean, simple flavors. If you like some heat, you can add chili oil, fresh chilies, or a sprinkle of cayenne as you serve.
Can I add protein to this ramen?
Definitely! Soft-boiled eggs, slices of cooked chicken or pork, or even tofu cubes are excellent options to make the dish more filling without overpowering the delicate broth.
How can I make the broth richer?
To deepen the broth’s flavor, consider adding a small piece of kombu (sea kelp) during boiling or a splash of mushroom soy sauce. Just be careful with salt adjustments since these ingredients bring extra umami.
What’s the best way to ensure noodles don’t get soggy?
Cooking the noodles separately and draining them well before adding to the broth is key. Adding them to the hot broth right before serving keeps them springy and prevents sogginess.
Final Thoughts
This Salt Ramen Recipe is proof that simple ingredients done well can create something truly special. Whether you’re new to making ramen or just want a quick, warm meal that feels like a treat, this recipe delivers on flavor, texture, and comfort. I can’t encourage you enough to give it a try—you might just find your new favorite go-to bowl!
Print
Salt Ramen Recipe
- Prep Time: 5 minutes
- Cook Time: 20 minutes
- Total Time: 25 minutes
- Yield: 2 servings
- Category: Soup
- Method: Stovetop
- Cuisine: Japanese
Description
This Salt Ramen recipe offers a simple yet flavorful bowl of traditional Japanese noodle soup, featuring a light, savory broth seasoned with salt, soy sauce, and sesame oil. Ready in just 25 minutes, it combines tender ramen noodles with aromatic green onions and crispy nori for an easy and comforting meal.
Ingredients
Broth
- 4 cups water
- 2 tsp salt
- 1 tsp soy sauce
- 1 tsp sesame oil
Noodles & Toppings
- 200 g ramen noodles
- 2 green onions, chopped
- 2 slices nori (dried seaweed)
Instructions
- Prepare the Broth: In a medium pot, bring 4 cups of water to a boil. Once boiling, add 2 teaspoons of salt, 1 teaspoon of soy sauce, and 1 teaspoon of sesame oil. Stir well to combine and create a flavorful broth base.
- Cook the Noodles: Add 200 grams of ramen noodles to the boiling broth and cook them according to the package instructions, usually about 3-4 minutes, until tender but still springy. Once cooked, strain the noodles to remove excess broth and divide evenly into serving bowls.
- Assemble and Serve: Pour the hot seasoned broth over the noodles in each bowl. Garnish with chopped green onions and place slices of nori on top to add texture and flavor. Serve immediately for the best experience.
Notes
- Adjust the salt level in the broth according to taste preference.
- For added protein, consider adding a boiled egg or sliced chicken.
- Use fresh green onions for a crisp, bright garnish.
- Do not overcook the noodles to maintain ideal texture.


