
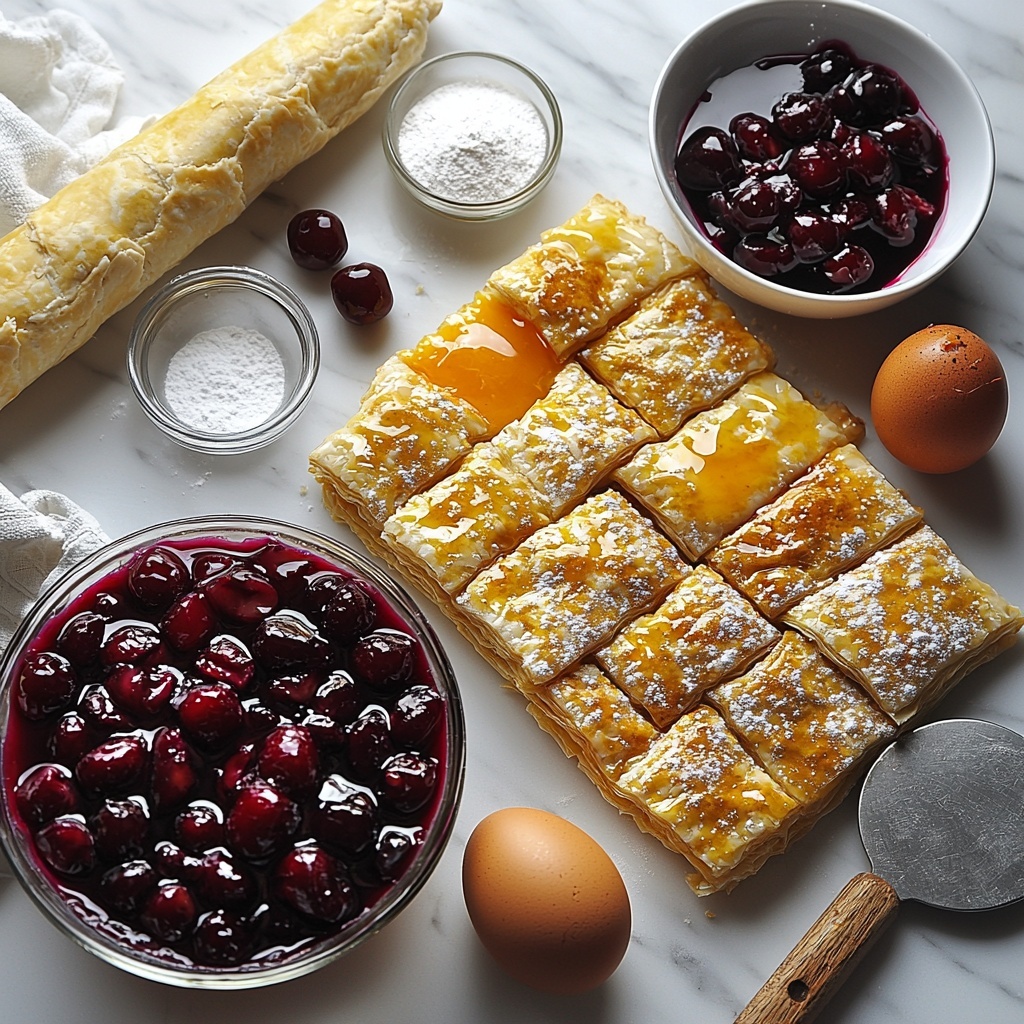
If you’re looking for a dessert that’s as delightful to eat as it is fun to make, the Cherry Pie Bombs Recipe is your next kitchen adventure. These little pastry pockets pack a burst of juicy cherry filling inside a crisp, flaky puff pastry shell that’s just heavenly. With every bite, you experience a wonderful harmony of sweet, tart cherries and buttery crust, making them irresistible treats for any occasion. Whether you’re hosting a party, craving a cozy homemade dessert, or wanting to surprise someone special, this recipe will quickly become a favorite go-to that’s as charming to make as it is to share.
Ingredients You’ll Need
Gathering the right ingredients is the first secret to making your Cherry Pie Bombs Recipe a success. Each component plays a crucial role in creating the perfect balance of flavors and textures — from the flaky puff pastry that wraps everything up to the luscious cherry filling that steals the show.
- 1 sheet puff pastry (thawed): This is your golden, flaky crust that crisps beautifully in the oven and holds the cherry filling perfectly.
- 1 cup cherry filling (fresh or canned): The star of your bombs, bringing that sweet and slightly tart burst in every bite.
- 1/4 cup granulated sugar: Sweetens the cherries just enough to enhance their natural flavor without overpowering them.
- 2 tablespoons cornstarch: Helps thicken the juicy filling so it stays inside your pastry, no messy leaks here!
- 1 egg (for egg wash): Adds a beautiful golden shine that makes these treats look as good as they taste.
- Powdered sugar (for dusting, optional): A final touch of elegance and sweetness to finish off your Cherry Pie Bombs Recipe.
How to Make Cherry Pie Bombs Recipe
Step 1: Prepare Your Puff Pastry Base
Start by preheating your oven to 400°F (200°C), ensuring it’s hot enough to give your pastry a perfect puff. Roll out the thawed puff pastry on a lightly floured surface to about 1/8 inch thick — this thickness is key to a delicate, flaky crust that’s not too doughy or too thin.
Step 2: Make the Cherry Filling
In a mixing bowl, combine the cherry filling, granulated sugar, and cornstarch. Stir until everything is nicely blended; this step ensures that once baked, the cherries will maintain their juiciness without oozing out. The cornstarch acts like a little magic agent, giving you a luscious, thick filling.
Step 3: Assemble the Cherry Pie Bombs
Using a round cutter or a clean glass, cut circles out of your rolled pastry. Spoon a small amount of the prepared cherry filling right into the center of each circle — don’t overfill, or they might burst open while baking. Then, fold each pastry circle in half, creating a charming little half-moon shape, and firmly pinch the edges to seal. For a decorative and secure touch, press the edges with the tines of a fork.
Step 4: Bake to Golden Perfection
Place your filled pastries on a parchment-lined baking sheet to prevent sticking. Brush each bomb lightly with the beaten egg — this not only adds a beautiful golden sheen but also gives the surface a slight gloss that makes them look simply irresistible. Slide them into your hot oven and bake for 15 to 20 minutes until the pastry is puffed and golden brown with an inviting aroma escaping from the oven.
Step 5: Final Touches
Once out of the oven, allow your Cherry Pie Bombs to cool just enough so they’re warm but not hot. This resting time lets the filling settle and makes them easier to handle. For a lovely presentation and a subtle hint of extra sweetness, dust the tops lightly with powdered sugar before serving.
How to Serve Cherry Pie Bombs Recipe
Garnishes
Cherry Pie Bombs are delightful on their own but garnishing them ups the charm instantly. Consider scattering fresh cherries or sprigs of mint around your serving plate for a burst of color and freshness. A light dusting of powdered sugar can add a festive, snow-like effect that makes them irresistible at holiday gatherings or casual get-togethers.
Side Dishes
Pair these treats with a scoop of vanilla ice cream or a dollop of whipped cream to complement the warm, flaky pastry with cool, creamy textures. If you’re planning a brunch or dessert spread, fresh fruit salad or a cup of rich coffee or tea provides a lovely contrast that balances the sweet and tart notes of the cherry filling.
Creative Ways to Present
Think outside the box by placing Cherry Pie Bombs in small decorative paper cups or arranging them on tiered serving trays for a party-ready look. You could also drizzle a simple vanilla glaze or drizzle melted dark chocolate over the tops for an elegant twist. Fun fact: serving them alongside a cheese platter can be an unexpected but divine flavor combo that’ll wow your guests!
Make Ahead and Storage
Storing Leftovers
If you have any Cherry Pie Bombs left after your feast, store them in an airtight container at room temperature for up to 2 days. This helps keep the pastry crisp and the filling fresh without losing any flavor or texture. For best taste, consume them as soon as possible.
Freezing
You can freeze unbaked Cherry Pie Bombs by assembling them on a tray and freezing until solid, then transferring to a freezer bag for up to one month. When ready to bake, place frozen bombs on the baking sheet and add a few extra minutes to your baking time. This way, you can enjoy fresh, warm bombs anytime you want with almost no prep.
Reheating
To bring leftover or frozen Cherry Pie Bombs back to life, reheat them in a 350°F oven for about 8-10 minutes until warmed through and crispy again. Avoid microwaving, as this can make the pastry soggy. A warm Cherry Pie Bomb fresh from the oven tastes just like when you first made it!
FAQs
Can I use frozen cherries for the filling?
Absolutely! Frozen cherries work well if you thaw and drain them beforehand to avoid excess moisture. Adjust the sugar slightly depending on how sweet your cherries are.
Can I make these vegan?
Yes, swap the egg wash for a plant-based milk or a mixture of maple syrup and water to get that beautiful glaze. Make sure the puff pastry you use is vegan-friendly as well.
How big should the pastry circles be?
About 3 to 4 inches in diameter works best. This size holds enough filling for a satisfying bite but is small enough to bake evenly and seal securely.
Is it okay to use canned cherry pie filling?
Definitely! Using canned cherry pie filling is a convenient shortcut. Just be mindful that it’s often already sweetened, so reduce extra sugar accordingly in the filling mixture.
Can I make the filling in advance?
You can prepare the cherry filling a day ahead and keep it refrigerated. This actually lets the flavors meld beautifully, making your Cherry Pie Bombs Recipe even more flavorful when baked.
Final Thoughts
There’s something truly special about the Cherry Pie Bombs Recipe that combines simplicity with show-stopping taste and texture. Whether you’re baking these for a casual treat or a special gathering, they bring such warmth and joy to the table. I encourage you to dive in, have fun assembling these little pockets of happiness, and enjoy every golden, flaky, cherry-filled bite. Trust me, they’re destined to become a cherished favorite in your recipe collection.
Print
Cherry Pie Bombs Recipe
- Prep Time: 15 minutes
- Cook Time: 20 minutes
- Total Time: 40 minutes
- Yield: 8 servings
- Category: Dessert
- Method: Baking
- Cuisine: American
- Diet: Vegetarian
Description
Delight in these Cherry Pie Bombs, a fun and delicious twist on classic cherry pie using flaky puff pastry filled with sweet cherry filling. Perfect as a handheld dessert or snack, these pies are golden, crisp, and bursting with fruity flavor, dusted lightly with powdered sugar for an elegant finish.
Ingredients
Pastry
- 1 sheet puff pastry (thawed)
Filling
- 1 cup cherry filling (fresh or canned)
- 1/4 cup granulated sugar
- 2 tablespoons cornstarch
Finishing
- 1 egg (for egg wash)
- Powdered sugar (for dusting, optional)
Instructions
- Preheat Oven and Prepare Pastry: Preheat your oven to 400°F (200°C). On a lightly floured surface, roll out the thawed puff pastry until approximately 1/8 inch thick to ensure a delicate, flaky crust.
- Prepare Cherry Filling: In a medium bowl, thoroughly combine the cherry filling with granulated sugar and cornstarch, ensuring the mixture is well blended to thicken during baking.
- Cut and Fill Pastry Circles: Using a round cutter or a glass, cut circles from the rolled-out puff pastry. Spoon a small amount of the cherry filling onto the center of each pastry circle, being careful not to overfill to prevent leakage.
- Seal and Decorate Edges: Fold each pastry circle in half over the filling to form a semicircle. Press edges firmly to seal and use a fork to crimp the edges for decoration and extra sealing.
- Bake: Arrange the sealed pastries on a baking sheet lined with parchment paper. Brush the tops with beaten egg to achieve a shiny, golden crust. Bake in the preheated oven for 15-20 minutes or until golden brown and puffed.
- Cool and Garnish: Remove from the oven and allow the Cherry Pie Bombs to cool slightly. Once cooled, dust with powdered sugar if desired before serving to add a touch of sweetness and elegance.
Notes
- Use fresh or canned cherries depending on availability; if using fresh, pitting is necessary.
- Ensure puff pastry is thawed properly before rolling to avoid tearing.
- Do not overfill the pastries to prevent filling from leaking during baking.
- For a glossy finish, brush with egg wash before baking.
- Cooling slightly before serving helps the filling set and avoid burns.


