
“`html
If you’ve ever dreamed of baking bakery-quality bread at home but felt intimidated by complicated recipes, you are going to adore this Easy Ciabatta Bread Recipe for Beginners – Light, Airy, and Foolproof Recipe. This recipe strikes the perfect balance of simplicity and authentic flavor, guiding you step-by-step to create that cherished ciabatta crumb—open and pillowy with a thin, crackly crust. It’s a satisfying journey from sticky dough to golden loaf, and every bite rewards your patience with rustic charm and fresh-baked goodness.
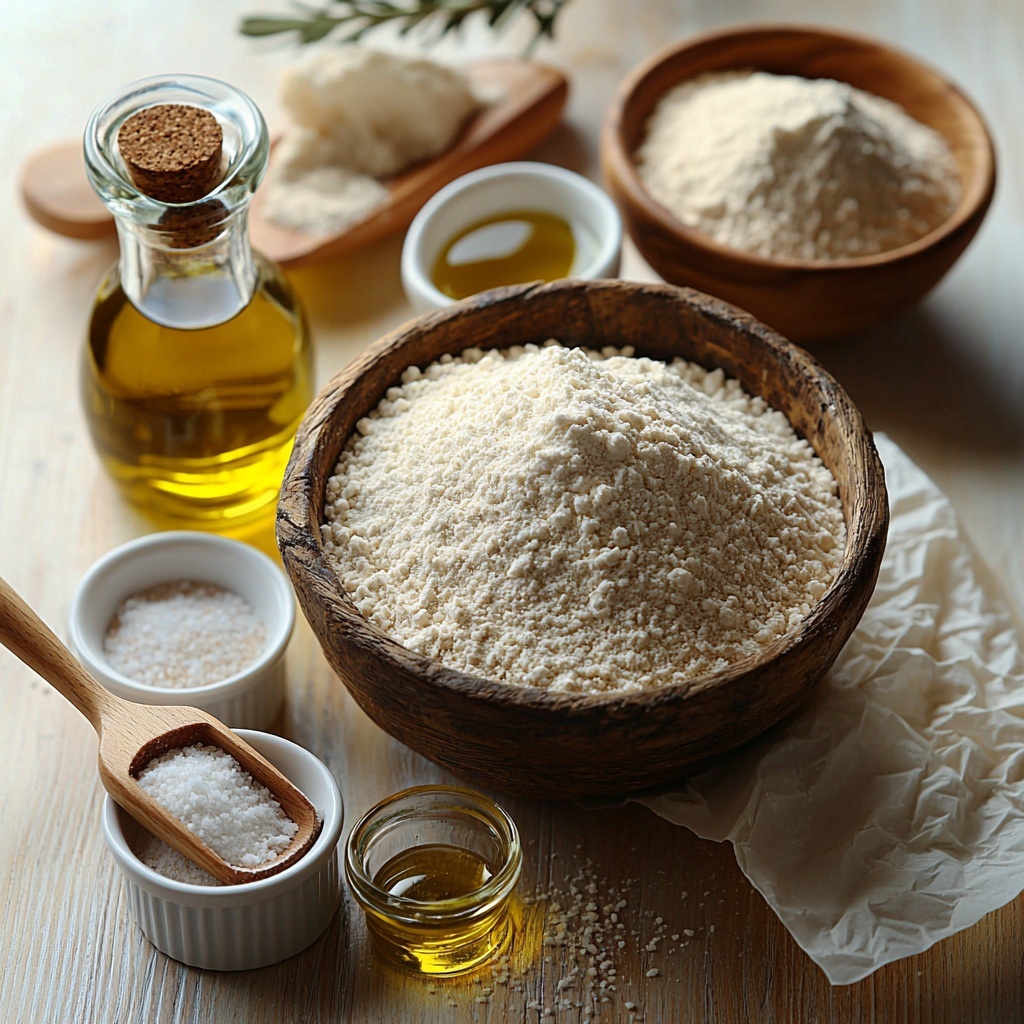
Ingredients You’ll Need
This ciabatta recipe calls for a handful of straightforward, kitchen-friendly ingredients, each playing an essential role in delivering the perfect texture, taste, and color. Together, they form a dough that’s pliable yet airy, rich but not heavy, setting you up for success every time.
- Bread flour (4 cups / 500 g): High protein content builds the dough’s chewy structure and supports that trademark airy crumb.
- Warm water (2 cups / 475 ml): The warmth activates the yeast and hydrates the flour, crucial for gluten development.
- Instant yeast (2 teaspoons): Convenient and fast-acting to give your dough the perfect rise; active dry yeast also works with minor adjustments.
- Fine sea salt (2 teaspoons): Balances the flavor and strengthens the gluten network for better texture.
- Olive oil (1 tablespoon): Optional but recommended for subtle richness and easier handling of the very wet dough.
- Semolina or extra flour for dusting: Prevents sticking during shaping without weighing down the dough.
- Parchment paper: Helps transfer the delicate dough smoothly into the oven.
How to Make Easy Ciabatta Bread Recipe for Beginners – Light, Airy, and Foolproof Recipe
Step 1: Make the Dough
The magic starts by whisking together your dry ingredients, then adding warm water and olive oil. Stir it all up with a spatula until just combined—expect a very wet and sticky dough, which is exactly what ciabatta needs to develop its airy structure.
Step 2: Rest the Dough (Autolyse)
Cover your bowl and let the dough rest for 20 to 30 minutes. This pause hydrates the flour fully and makes the gluten easier to work with, setting you up for a sponge-like crumb.
Step 3: First Stretch-and-Fold
Wet your hands and gently grab one edge of the dough, stretch it upward, then fold it over the center. Rotate the bowl and repeat about four times. This process helps strengthen the dough without kneading, turning it into a cohesive ball. Cover and rest for another 30 minutes.
Step 4: Repeat Folds
Two more rounds of stretch-and-folds, spaced 30 minutes apart, will further develop the gluten. Each time, the dough should feel silkier and hold shape better. Keep your hands wet to avoid sticking—it’s a messy, fun step that really pays off.
Step 5: Bulk Rise
Let the dough rest covered in a warm spot for one to two hours until it doubles in size and becomes soft and jiggly. This rise is where fermentation creates those signature ciabatta flavors and an irresistible open crumb.
Step 6: Prepare to Bake
Place a baking stone or inverted sheet pan inside your oven and preheat to 475°F (245°C) for at least 30 minutes; this intense heat jump-starts crust formation. Place an empty metal pan on the lower rack to hold water for steam—key for crust crispness.
Step 7: Shape the Dough Gently
Dust your work surface generously with semolina or flour. Carefully scrape the dough out, trying not to deflate it. Dust the top more, then use a bench scraper to coax it into a roughly one-inch-thick rectangle. Cut into two equal pieces—delicate handling here keeps the airy crumb intact.
Step 8: Final Shaping
Lift each piece with floured hands and gently stretch it into a longer slipper shape. Resist the urge to press down; your goal is to maintain as much air inside as possible. Place the loaves on a parchment paper-lined sheet, giving them space to expand during proofing.
Step 9: Final Proof
Cover the loaves loosely with a towel and let them rest for about 30 to 45 minutes until they puff slightly. Meanwhile, boil a cup of water for creating steam when baking—it’s a small step that results in that artisan crust everyone loves.
Step 10: Steam and Bake
Slide your parchment with the loaves onto the hot stone or tray. Pour the boiling water into the empty pan below and quickly close the oven door to trap the steam. Bake for 12 minutes, remove the steam tray, rotate the loaves for even browning, and continue baking another 10 to 15 minutes until a deep golden crust forms.
Step 11: Cool Completely
Transfer your freshly baked ciabatta to a wire rack and wait at least 45 minutes before slicing. Cutting too soon squashes the delicate crumb and can make the texture gummy. The patience here ensures every slice boasts perfect lightness and structure.
How to Serve Easy Ciabatta Bread Recipe for Beginners – Light, Airy, and Foolproof Recipe
Garnishes
This bread shines on its own but also stuns with a few well-chosen extras. Brush a bit of good-quality olive oil and sprinkle flaky sea salt on warm slices for an irresistible snack. Fresh herbs, garlic butter, or a smear of fresh ricotta can turn simple ciabatta into an unforgettable treat.
Side Dishes
Ciabatta’s open crumb and crusty exterior make it the perfect companion for a range of dishes. Pair it with hearty soups, vibrant salads, or rich Italian sauces. Its absorbent nature means every bite soaks up broths and olive oils beautifully, boosting your meal’s overall flavor profile.
Creative Ways to Present
Transform your loaves into bruschetta bases topped with colorful tomatoes and basil, or slice thickly to make rustic sandwiches bursting with fresh ingredients. For a crowd-pleasing option, serve ciabatta torn into chunks alongside a charcuterie board—it’s also fantastic dipped into flavored oils or balsamic vinegar.
Make Ahead and Storage
Storing Leftovers
Keep any leftover ciabatta in a breathable paper bag or loosely wrapped in a kitchen towel at room temperature to maintain its crust. Avoid plastic bags which trap moisture and soften the bread. It will stay fresh for up to two days, perfect for day-after sandwiches or toast.
Freezing
If you want to enjoy your ciabatta over a longer period, slice it and place in an airtight freezer bag or wrap tightly in foil. When frozen, it holds its texture beautifully for up to three months—ready to be pulled from the freezer on demand.
Reheating
To revive that freshly baked taste and crisp crust, reheat slices in a toaster or warm the whole loaf in a 350°F (175°C) oven for 5 to 10 minutes. Avoid microwaving, which makes bread chewy and dense. A quick refresh is all it takes to turn leftovers into something amazing again.
FAQs
Can I use all-purpose flour instead of bread flour?
While all-purpose flour can work in a pinch, bread flour is preferred because its higher protein content develops stronger gluten. This results in that essential chewy texture and open crumb unique to ciabatta bread.
What if the dough feels too sticky to handle?
Ciabatta dough is naturally wetter and stickier than other breads. Using wet hands when folding and shaping helps manage the stickiness, and generous dusting with semolina or flour prevents sticking without compromising texture.
Why is steam important when baking ciabatta?
Steam creates a moist environment inside the oven, allowing the crust to expand before setting. This produces a glossy, crisp crust and prevents the loaf from drying out too quickly, giving ciabatta its signature texture and color.
How can I tell when the bread is done baking?
Look for a deep golden brown crust that feels firm to the touch. The loaf should sound hollow when tapped underneath. Using an instant-read thermometer, the internal temperature should reach around 200°F (93°C) for perfect doneness.
Can I make this recipe without olive oil?
Yes, olive oil is optional and mainly adds flavor and easier dough handling. Omitting it won’t drastically change the bread but may result in a slightly different texture and stickier dough to work with.
Final Thoughts
Baking bread at home is as rewarding as it is delicious, and this Easy Ciabatta Bread Recipe for Beginners – Light, Airy, and Foolproof Recipe is your golden ticket to homemade artisan bread with minimal fuss. Don’t shy away from the sticky dough or the wait—the results are absolutely worth it. Give it a try, share your warm loaves with loved ones, and watch your confidence in bread baking soar!
“`
Print
Easy Ciabatta Bread Recipe for Beginners – Light, Airy, and Foolproof Recipe
- Prep Time: 45 minutes
- Cook Time: 27 minutes
- Total Time: 3 hours 55 minutes
- Yield: 12 servings (2 large ciabatta loaves)
- Category: Bread
- Method: Baking
- Cuisine: Italian
Description
This Easy Ciabatta Bread Recipe is perfect for beginners looking to create a light, airy, and foolproof Italian classic at home. Using simple ingredients and stretch-and-fold techniques combined with steam baking, this recipe delivers crusty, chewy ciabatta with minimal fuss and maximum flavor. The long resting and proofing periods help develop the characteristic open crumb and delightful texture.
Ingredients
Dough Ingredients
- 4 cups (500 g) bread flour (high protein)
- 2 cups (475 ml) warm water, about 95–105°F
- 2 teaspoons instant yeast (or 2 1/4 teaspoons active dry yeast)
- 2 teaspoons fine sea salt
- 1 tablespoon olive oil (optional, for flavor and handling)
Baking Ingredients
- Semolina or extra flour for dusting
- Parchment paper for transferring dough
Instructions
- Make the dough: In a large bowl, whisk together the bread flour, instant yeast, and fine sea salt. Add the warm water and olive oil if using. Stir with a spatula until no dry spots remain. The dough will be very wet and sticky, which is expected for ciabatta.
- Rest (autolyse): Cover the bowl and let the dough rest for 20–30 minutes. This hydration period helps the flour absorb moisture and kickstarts gluten formation.
- First stretch-and-fold: With wet hands, grab one edge of the dough, stretch it up, and fold it over the center, then rotate the bowl and repeat 4 times to form a rough ball. Cover again and rest for 30 minutes.
- Repeat folds: Perform two more rounds of stretch-and-folds spaced 30 minutes apart. The dough will gradually become smoother and more stable. Keep hands damp to avoid sticking.
- Bulk rise: Cover the bowl and let the dough rise in a warm spot for 1–2 hours until it’s puffed up and roughly doubled in size, wobbling like a soft pillow when jiggled.
- Prepare the bake setup: Place a baking stone or an inverted sheet pan in the oven and preheat it to 475°F (245°C) for at least 30 minutes. Put an empty metal pan on the lower rack to create steam during baking.
- Shape gently: Dust a clean counter generously with flour or semolina and carefully scrape the dough out without deflating it. Dust the top with extra flour and use a bench scraper to shape it into a rectangle about 1 inch thick. Cut into two equal pieces.
- Final shaping: With floured hands, lift each piece and gently stretch into a longer slipper shape, avoiding pressing down to keep as much air inside as possible. Place each loaf on a parchment paper sheet dusted with flour or semolina, leaving space between them.
- Final proof: Cover the loaves loosely with a towel and let them rest for 30–45 minutes until slightly puffy. Meanwhile, bring one cup of water to a boil to create steam in the oven.
- Steam and bake: Slide the parchment with the loaves onto the hot baking stone or sheet pan. Quickly pour the boiling water into the empty metal pan below and close the oven door to trap steam. Bake for 12 minutes, then remove the steam pan, rotate the loaves, and bake for another 10–15 minutes until the bread is deep golden brown.
- Cool completely: Transfer the loaves to a wire rack and allow them to cool completely for at least 45 minutes before slicing. Cutting too soon can squash the crumb and make it gummy.
Notes
- If using active dry yeast instead of instant yeast, dissolve it in a small portion of the warm water and let it activate for 5–10 minutes before adding to the flour mixture.
- The dough will be very wet compared to typical bread dough—this is important for ciabatta’s open crumb structure.
- Use wet hands during stretch-and-folds to prevent sticking.
- Generating steam in the oven is key to achieving a crisp crust and good oven spring.
- Be gentle when shaping to maintain air pockets inside the dough.
- Allow the bread to cool completely before slicing for best texture and crumb integrity.


