“`html
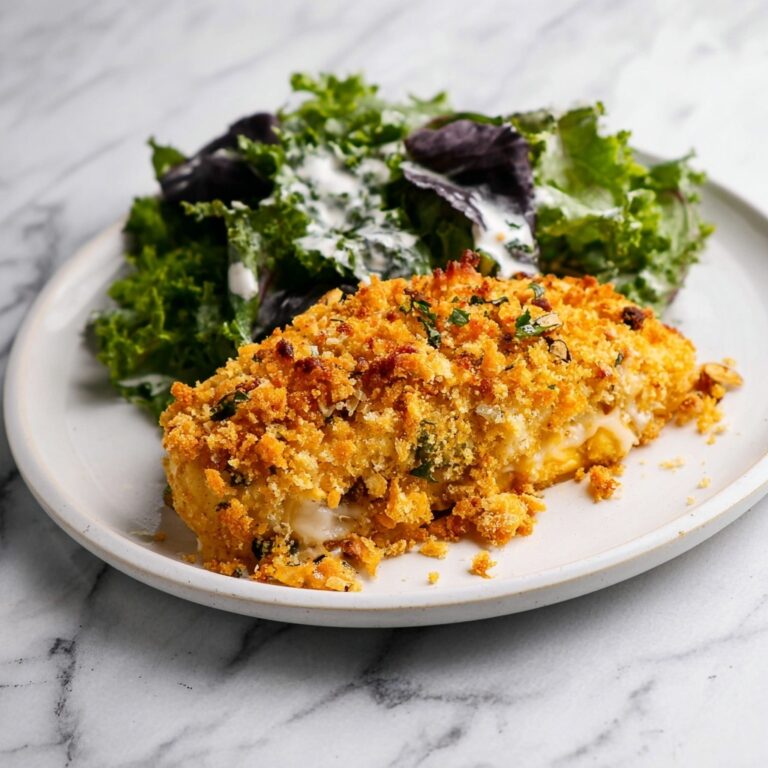
If you’re craving something irresistibly rich and comforting, this Creamy Chicken Breast Recipe is an absolute game changer. Tender chicken breasts cooked in a luscious, velvety sauce that brings together simple ingredients to create a dish bursting with flavor. Whether you’re making a weeknight dinner or impressing guests, this recipe offers a perfect balance of creamy indulgence and satisfying heartiness that everyone will love.

Ingredients You’ll Need
These ingredients are wonderfully straightforward but essential in crafting the perfect creamy sauce and juicy chicken breasts that make this recipe stand out. Each one contributes an important element—whether it’s flavor, texture, or a splash of color to bring the dish to life.
- Chicken breasts: The star of the dish, choose boneless and skinless for quick, even cooking.
- Butter: Adds richness and helps create that silky sauce texture.
- Garlic: Fresh garlic infuses a fragrant depth of flavor that warms every bite.
- Heavy cream: The secret to that signature creamy consistency that coats the chicken beautifully.
- Parmesan cheese: Adds a sharp, salty punch enhancing the sauce’s complexity.
- Chicken broth: Builds flavor and thins the sauce just enough to keep it luscious but not heavy.
- Italian seasoning: A blend of herbs that brings brightness and an herbaceous kick.
- Salt and pepper: Simple seasonings that bring out the best in every ingredient.
- Fresh parsley: Adds a pop of color and a fresh herbal note at the end.
How to Make Creamy Chicken Breast Recipe
Step 1: Prepare the Chicken
Start by seasoning your chicken breasts generously with salt, pepper, and Italian seasoning. This ensures every bite is packed with flavor right from the start. Heat a generous knob of butter in a large skillet over medium heat and sear the chicken breasts until golden and cooked through, about 5-6 minutes per side. Don’t rush this step—you want that beautiful golden crust to lock in all the juices.
Step 2: Make the Creamy Sauce
Once the chicken is out of the pan, it’s time to create the sauce that defines this Creamy Chicken Breast Recipe. In the same skillet, melt butter and add minced garlic, cooking just until fragrant to avoid any bitterness. Pour in the chicken broth to deglaze the pan, scraping up those flavorful browned bits. Stir in heavy cream and sprinkle in Parmesan cheese, whisking continuously until the sauce thickens into a rich, silky coating. The spices and cheese marry perfectly here, boosting the sauce’s luxurious texture.
Step 3: Combine and Simmer
Return the chicken breasts to the skillet, nestling them gently into the creamy sauce. Let everything simmer together for a few more minutes so the chicken absorbs the flavors while the sauce thickens just a touch more. This final simmer seals the deal by marrying all those delightful tastes, making the Creamy Chicken Breast Recipe absolutely irresistible.
How to Serve Creamy Chicken Breast Recipe
Garnishes
Fresh chopped parsley sprinkled over the top not only brightens up the presentation but also adds a refreshing herbal note that cuts through the richness beautifully. Feel free to add a squeeze of lemon juice for a zesty twist that wakes up the palate.
Side Dishes
This dish pairs wonderfully with buttery mashed potatoes or creamy risotto, each soaking up the luxurious sauce perfectly. Steamed or roasted green vegetables like asparagus or broccoli add a crisp contrast, balancing the plate with freshness and texture.
Creative Ways to Present
For a fun twist, serve the creamy chicken breast sliced over a bed of buttery garlic noodles or creamy polenta. You can also turn it into a hearty sandwich filling with crusty bread and some baby greens for a casual yet indulgent meal anytime.
Make Ahead and Storage
Storing Leftovers
You can store any leftover Creamy Chicken Breast Recipe in an airtight container in the refrigerator for 3-4 days. This keeps the flavors fresh and the chicken tender, making for super quick meals later in the week.
Freezing
While it’s best fresh, you can freeze this dish if needed by placing the creamy chicken in a freezer-friendly container. It will hold well for up to 2 months. Just be mindful that the texture of cream sauces can change slightly after thawing.
Reheating
To reheat, gently warm the chicken in a skillet over low heat to avoid curdling the sauce, adding a splash of chicken broth or cream if it seems too thick. Alternatively, microwaving in short bursts with stirring in between works well for a quick fix.
FAQs
Can I use chicken thighs instead of breasts?
Absolutely! Chicken thighs stay juicy and flavorful even if cooked a little longer, making them a great substitute for this creamy sauce-based recipe.
Is heavy cream necessary or can I use milk?
Heavy cream is key for that velvety, thick sauce texture. Milk will work but the sauce will be thinner and less rich, so adding a bit of cornstarch can help thicken it up.
Can I prepare this recipe dairy-free?
You can try using dairy-free butter and cream substitutes like coconut cream or almond milk-based options, but expect a slightly different flavor profile and texture in the sauce.
How do I keep the chicken moist during cooking?
Don’t overcook the chicken—sear it until golden and finished through, then let it simmer briefly in the sauce. This keeps the chicken tender and perfectly juicy every time.
What can I add to make it more flavorful?
Consider adding a splash of white wine to deglaze the pan or a sprinkle of crushed red pepper flakes for a gentle heat kick to enhance the sauce.
Final Thoughts
This Creamy Chicken Breast Recipe is a true crowd-pleaser, delivering homemade comfort in every bite. It’s easy enough for weeknights yet elegant enough to impress, making it a perfect go-to for your meal rotation. I highly encourage you to give it a try and watch it become one of your personal favorites!
“`
Print
Creamy Chicken Breast Recipe
- Prep Time: 15 minutes
- Cook Time: 0 minutes
- Total Time: 45 minutes
- Yield: 12 servings
- Category: Dessert
- Method: No-Cook
- Cuisine: American
Description
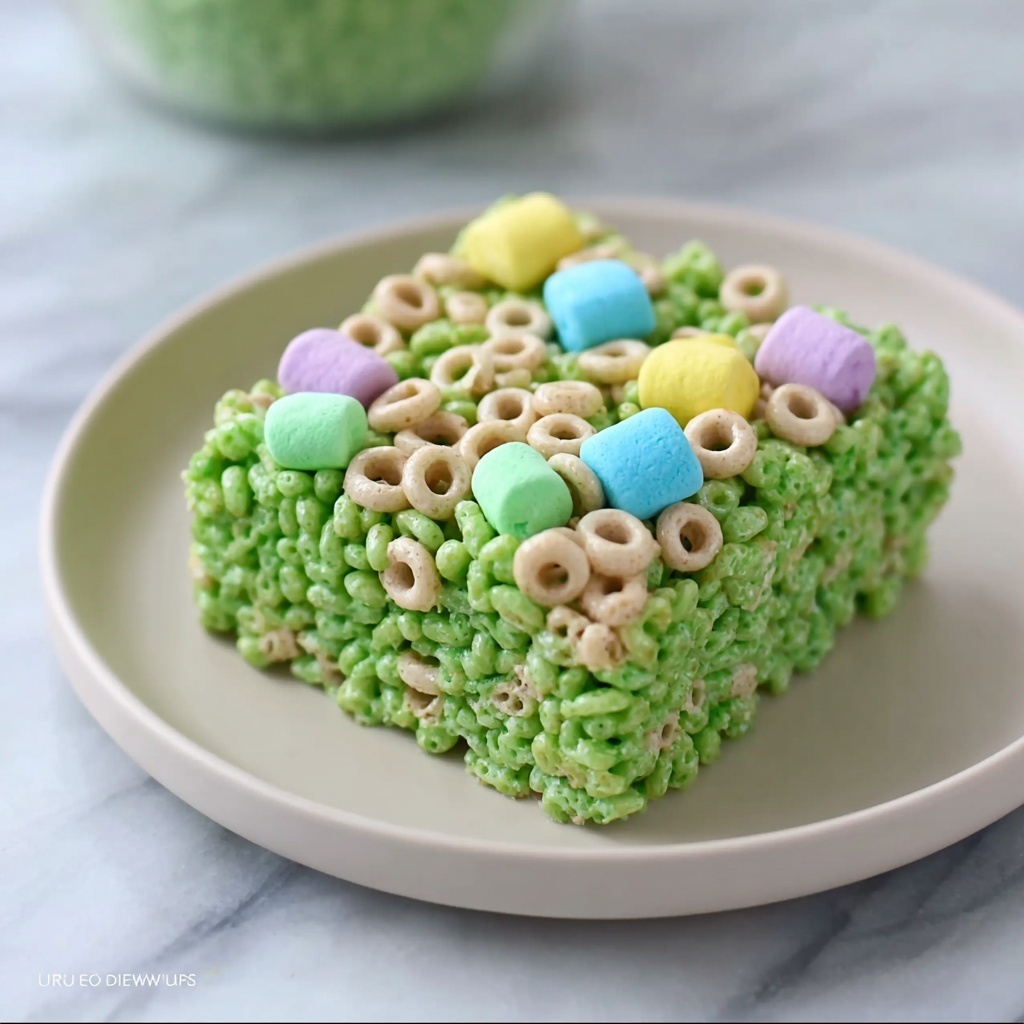
These Lucky Charms Rice Krispie Treats are a fun and colorful twist on the classic no-bake dessert. Combining the crispy textures of Rice Krispies and Lucky Charms cereals with gooey melted marshmallows and a pop of green coloring, these treats are perfect for parties, snacks, or anytime you want a sweet, cheerful treat that’s easy to make.
Ingredients
Dry Ingredients
- 5 cups Lucky Charms Cereal, plus extra marshmallows for topping
- 4 cups Rice Krispies Cereal
Wet Ingredients
- 1 (10.50 oz) bag mini marshmallows
- 5 teaspoons salted butter
- Green gel food coloring, to desired intensity
Instructions
- Prepare baking dish: Butter a 9×13-inch baking dish thoroughly to prevent the treats from sticking and set it aside.
- Melt marshmallows: In a microwave-safe bowl, microwave the mini marshmallows in 20-second increments twice, stirring each time, until they are partially melted but not fully liquefied.
- Melt butter: In another microwave-safe bowl, microwave the salted butter in 20-second increments until it is almost completely melted.
- Combine butter and marshmallows: Add the melted butter to the partially melted marshmallows, then microwave the mixture for 20 more seconds to help everything meld together smoothly.
- Mix well and color: Stir the combined marshmallow and butter mixture thoroughly. Add green gel food coloring and mix until the color is evenly distributed throughout.
- Add cereals: Stir in the Rice Krispies cereal first, mixing well until all pieces are coated with the marshmallow mixture. Then gently fold in the Lucky Charms cereal until all the cereal pieces are evenly coated.
- Press into dish: Using a buttered rubber spatula, press the mixture evenly and firmly into the prepared baking dish to form a compact layer.
- Add extra marshmallows: Sprinkle additional Lucky Charms marshmallows on top as a decorative and tasty topping.
- Chill: Refrigerate the treats for 30 minutes so they set and firm up for easier cutting.
- Serve: Cut into 12 standard squares or 8 larger squares if desired, and enjoy your colorful, crunchy, and sweet Lucky Charms Rice Krispie Treats!
Notes
- For easier mixing and pressing, butter your hands or spatula to prevent sticking.
- Adjust the green gel food coloring according to your preferred color intensity.
- Store leftover treats in an airtight container at room temperature for up to 3 days to maintain freshness.
- Feel free to add other cereal or candy mix-ins for extra flavor and texture.

